Spotify has revolutionized the way we consume music, offering a vast library of songs, albums, and playlists at our fingertips. But what about those cherished tracks and rare gems that aren't available on the platform? Luckily, Spotify allows you to augment your music library through the process to upload MP3 to Spotify.
By adding local files, you can seamlessly blend your favorite tunes with Spotify's extensive catalog, creating a unified listening experience tailored to your preferences. In this guide, we'll walk you through the process of adding local files to Spotify. And with the free tool converting Spotify songs to MP3, enables you to enjoy all your favorite songs in one convenient place. Let's get started!
Contents Guide Part #1: How to Upload MP3 to SpotifyPart #2: How to Upload MP3 to Spotify as An ArtistPart #3: Bonus Tip: Best Way to Listen to Spotify MusicConclusion
Part #1: How to Upload MP3 to Spotify
Method #1: Through macOS And Windows Computers
Here are the steps to upload or add local files to Spotify using macOS and Windows computers:
- Launch the Spotify Application. Open the Spotify application on your macOS or Windows computer. Make sure you have the latest version of Spotify installed.
- Go to Settings. In the top-right corner of the Spotify window, click on the downward-facing arrow to access the drop-down menu. From the options presented, select "Settings ".
- Scroll down to Local Files. Within the Settings menu, scroll down until you find the "Local Files " section. It is usually located towards the bottom of the menu.
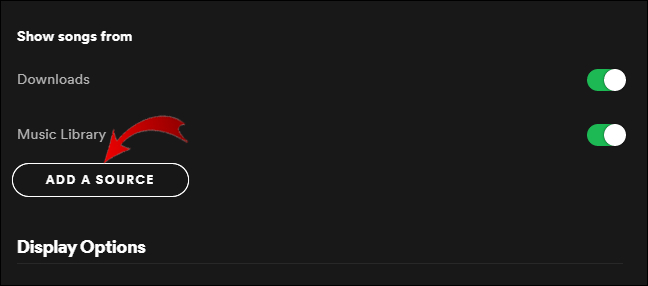
- Add a Source Folder. Under the "Local Files" section, click on the "Add a Source " button. A file browser window will appear.
- Choose the Folder with Your Local Files. Navigate through the file browser and select the folder on your computer that contains the MP3 files you want to add to Spotify. Click "OK " or "Choose " to confirm your selection.
- Enable the Source. Once you've selected the folder, toggle the switch next to it to enable the source. This action allows Spotify to scan the folder for any compatible local files.
- Wait for the Scan to Complete. Spotify will automatically scan the selected folder for compatible local files and add them to your Spotify library. The scanning process may take a few minutes, depending on the number of files in the folder.
- Access Your Local Files. To access your local files, go to the "Your Library " section in Spotify's left-hand sidebar. Scroll down until you see the "Local Files " category. Your uploaded MP3 files should now be visible and available for playback.

Congratulations! You now successfully upload MP3 to Spotify using your macOS or Windows computer. Enjoy listening to your personalized music collection alongside Spotify's vast library.
Method #2: Through Android And iOS Devices
Here are the steps to upload or add local files to Spotify using Android and iOS devices:
- Install the Spotify App. Download and install the Spotify app from the Google Play Store (Android) or the App Store (iOS) on your device. Ensure that you have the latest version of the app installed.
- Prepare Your Local Files. Connect your Android or iOS device to your computer using a USB cable. Copy the MP3 files you want to add to Spotify into a folder on your device. Make a note of the folder’s location for later use.
- Open the Spotify App. Launch the Spotify app on your Android or iOS device. Log in to your Spotify account or create a new account if you haven’t done so already.
- Access Settings. Tap on the gear icon located in the top-right corner of the Spotify app’s home screen. This will take you to the Settings menu.
- Select “Local Files”. Within the Settings menu, scroll down and find the “Local Files ” option. Tap on it to proceed.
- Enable Local File Sources. Toggle the switch next to “Show Local Files ” to enable the feature. This action allows Spotify to recognize and import local files from your device.
- Choose Source Folder. Tap on “Choose Source Folder ” and navigate to the folder on your device where you copied the MP3 files in Step 2. Select the folder and confirm your choice.
- Wait for the Scan to Complete. Spotify will automatically scan the selected folder for compatible local files and add them to your Spotify library. The scanning process may take a few moments, depending on the number of files in the folder.
- Access Your Local Files. To access your local files, go to the “Your Library ” section in the Spotify app. Scroll down until you see the “Local Files ” category. Your uploaded MP3 files should now be visible and available for playback.
Congratulations! You have successfully uploaded or added local MP3 files to Spotify using your Android or iOS device. Enjoy listening to your personalized music collection alongside Spotify's vast library.
Part #2: How to Upload MP3 to Spotify as An Artist
Choosing to upload MP3 to Spotify as an artist allows you to distribute your music to a wider audience. Here are the steps to upload MP3 files to Spotify as an artist:
Step #1: Sign up for a Spotify for Artists Account
If you haven't already, sign up for a Spotify for Artists account. Visit the Spotify for Artists website and follow the instructions to create your account. You will need to provide relevant information about yourself and your music.
Step #2: Verify Your Artist Profile
After signing up, you need to verify your artist profile on Spotify. Spotify will review your application and confirm your identity as an artist. Once verified, you will gain access to the Spotify for Artists dashboard.
Step #3: Access the Spotify for Artists Dashboard
Log in to your Spotify for Artists account to access the dashboard. The dashboard provides various tools and features for managing your artist profile and music.
Step #4: Navigate to the Music tab
Within the Spotify for Artists dashboard, locate and click on the "Music " tab. This section allows you to manage your existing music releases and upload new tracks.
Step #5: Upload Your MP3 Files
In the "Music" tab, you will find an option to upload new music. Click on the "Upload a New Release " or similar button. Follow the prompts to provide the necessary information about your release, such as the title, artist name, album artwork, and release date.
Step #6: Choose the MP3 Files to Upload
During the release creation process, you will be prompted to select the MP3 files you want to upload. Browse your computer's files and select the MP3 files of your songs.
Step #7: Add Song Details
After selecting the MP3 files, you'll need to add specific details for each song, including the track name, featured artists (if applicable), track numbers, and other relevant information.
Step #8: Review and Submit Your Release
Carefully review the information you have provided for your release, including song details, album artwork, and release date. Once you are satisfied, submit your release for review.
Step #9: Await Release Approval
Spotify will review your submission to ensure it meets their guidelines and standards. The review process may take a few days. You will receive a notification once your release is approved.
Step #10: Track Your Release
After your release is approved, you can track its performance, view statistics, and manage your artist profile through the Spotify for Artists dashboard.
Part #3: Bonus Tip: Best Way to Listen to Spotify Music
Now that you’ve learned how to upload MP3 to Spotify, we’ll give you a bonus tip. Spotify Music Unlocker is a third-party software that claims to allow users to listen to Spotify Premium features for free. The software works by bypassing Spotify's DRM protection, which allows users to download and listen to songs offline, skip songs without ads, and listen to high-quality audio.
Here’s how to use the tool:
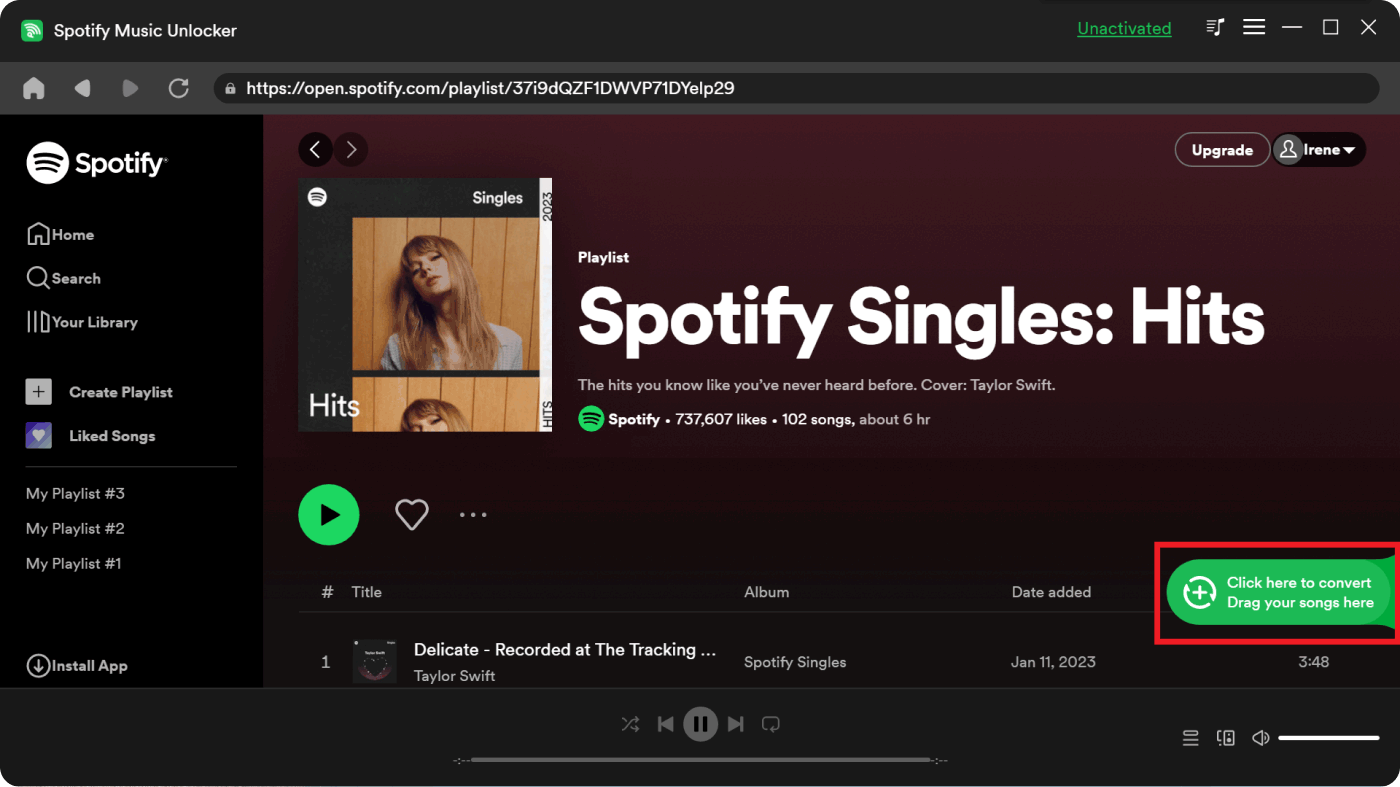
Step #1: Launch Spotify Music Unlocker and click the "Open the Spotify web player " button.
Step #2: Sign in to your Spotify account. If you don't have an account, click the "Sign up " button to create one.
Step #3: Select an album or playlist. Click the green "add" button to add all of the songs on the album or playlist to the list. You can also drag the album or playlist title onto the green "add" icon.

Step #4: To convert a single song, drag its title to the blue icon.
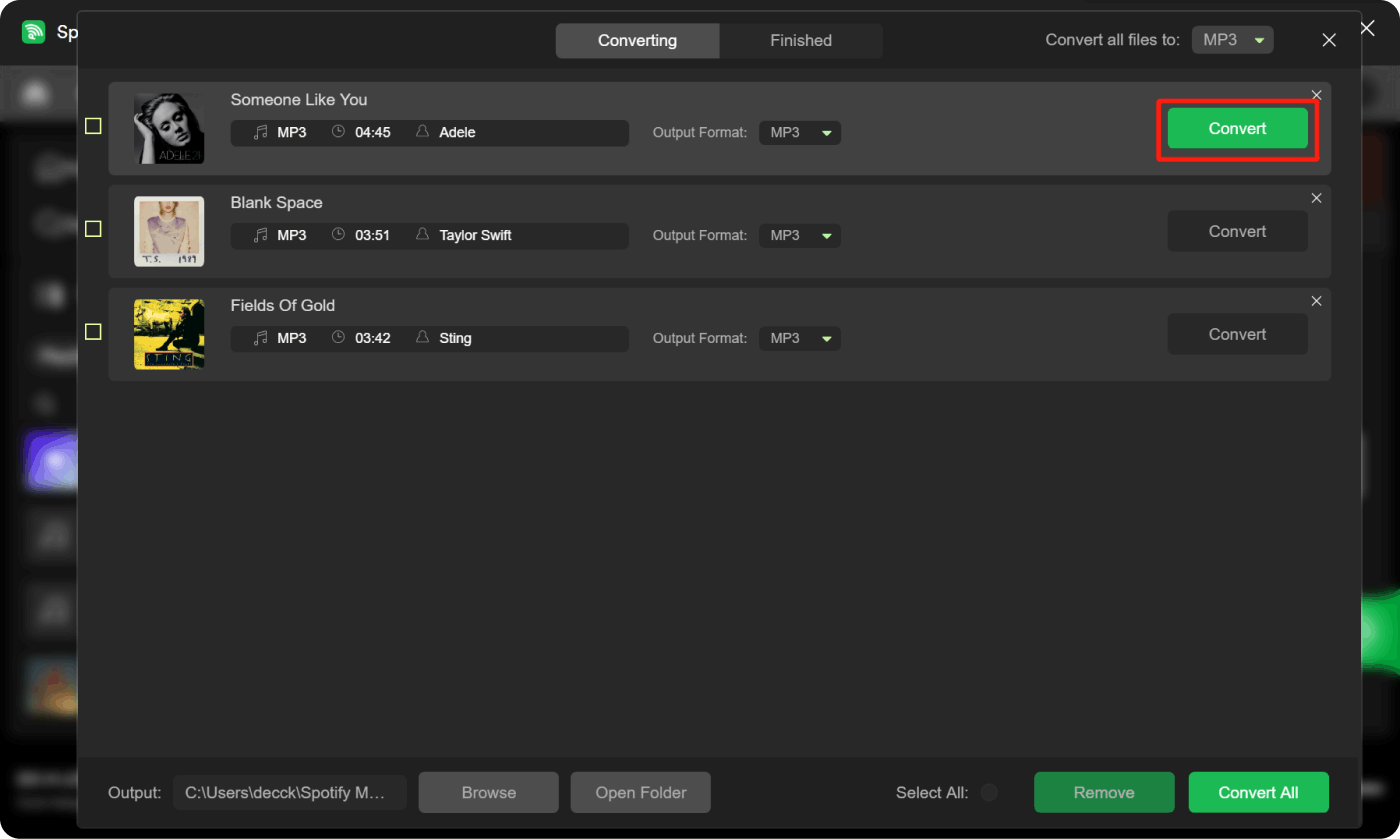
Step #5: Select the output format you want to use. You can choose MP3, M4A, WAV, or FLAC. You can also select an output folder.
Step #6: Click the "Convert " button to start converting the selected songs.

People Also Read How to Sync Spotify to Apple Watch: A Step-by-Step Guide How to Change Picture on Spotify Playlist: Guide for You
Conclusion
Spotify Music Unlocker is a powerful tool that allows users to upload MP3 to Spotify. It can also download songs at up to 4 times the speed of the Spotify app. This makes it a fast and convenient way to get your favorite songs offline, so you can listen to them even when you don't have an internet connection.
Written By Rosie
Last updated: 2023-05-18