As music aficionados, there's nothing quite like curating the perfect Spotify playlist that mirrors our unique tastes and emotions. Over time, these handpicked collections become an integral part of our daily lives, accompanying us on every adventure, soothing our souls during quiet moments, and igniting memories with every beat.
However, there might come a time when you wish to switch to a new Spotify account, whether due to a fresh start or simply for organizational reasons. The question then arises: Can you transfer Spotify playlist to another account without losing them forever?
The answer is a resounding yes! In this article, we'll unveil a simple and effective method to transfer your treasured Spotify playlist to another account, preserving your musical journey and ensuring that the melodies that mean so much to you remain intact.
With just a few easy-to-follow steps, you can seamlessly migrate your playlists, bringing along the songs that have become the soundtrack to your life. So, let's dive in and explore how you can maintain music continuity and keep the rhythm of your life uninterrupted!
Contents Guide Part #1: How to Transfer Spotify Playlist to Another Account on SpotifyPart #2: How to Transfer Spotify Playlist to Another Account Using A Third-Party ToolPart #3: The Best Way to Keep Your Spotify Playlists: Spotify Music Unlocker
Part #1: How to Transfer Spotify Playlist to Another Account on Spotify
Method #1: Manual Method of Copying the Playlist
If you're looking for a straightforward way to transfer Spotify playlist to another account, the manual method of copying the playlist can be a reliable option. Although it might require a bit of time and effort, this process ensures that your playlist remains intact, including the order of the tracks and any customizations you've made. Here's how you can do it:
Step #1: Create A New Playlist on the Destination Account
Log in to the new Spotify account where you want to transfer the playlist. Once you're in, create a new playlist with a name that matches the one you wish to transfer. This will serve as a blank canvas where we'll copy all your favorite songs.
Step #2: Switch to the Source Account
Now, go back to your original Spotify account, where the playlist you want to transfer is currently located.
Step #3: Make the Playlist Public
In order to copy the playlist to your new account, you'll need to make it public temporarily. Don't worry; you can switch it back to private after the transfer is complete. To make the playlist public, right-click on the playlist name and select "Make Public".
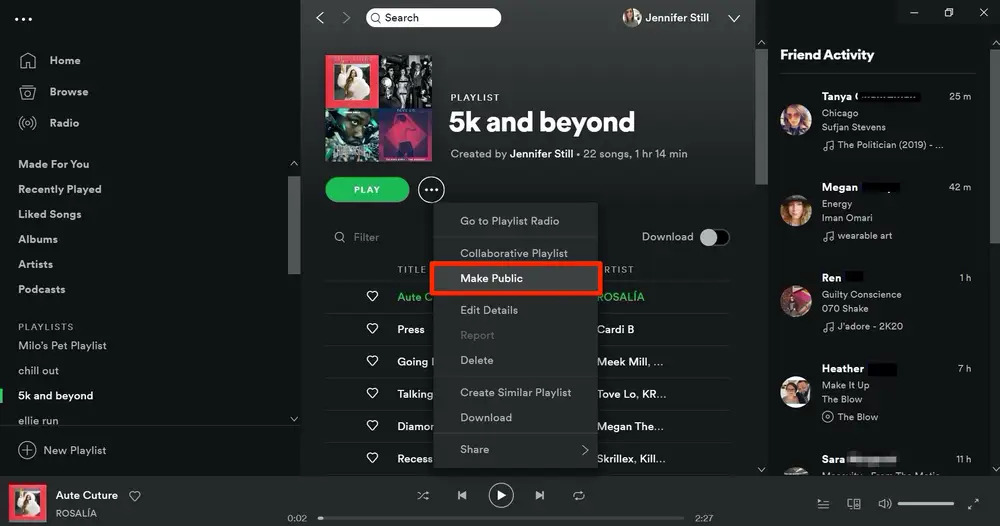
Step #4: Copy the Playlist Link
Right-click on the playlist again, but this time, choose "Copy Playlist Link" from the menu that appears.
Step #5: Open the Playlist Link
Next, paste the copied link into a web browser and open it. This will lead you to the public playlist on Spotify.
Step #6: Follow the Playlist
While viewing the public playlist, click the "Follow" button to add it to your Spotify library.
Step #7: View Your Followed Playlists
Now, go back to your new Spotify account and navigate to the "Your Library" section. Click on "Playlists", and you should see the recently followed playlist at the top.
Step #8: Convert to Private (Optional)
If you want to keep the playlist private on your new account, you can switch it back to private mode. Simply click on the playlist's three-dot menu and select "Make Private".
Congratulations! You now transfer Spotify playlist to another account using the manual method of copying. Now, all your favorite songs, meticulously arranged in your chosen order, are ready to accompany you on your musical journey with your new account. If you have multiple playlists to transfer, you can repeat these steps for each one, ensuring a seamless transition to your fresh Spotify experience.
Method #2: Share Playlists between Accounts Using Collaborative Playlists
If you're searching for a quicker and more streamlined approach to transfer your Spotify playlist to another account, utilizing Collaborative Playlists can be an excellent solution. This method allows you to share the playlist directly between accounts without the need for making the playlist public. Follow these steps to get started:
Step #1: Log In to Both Spotify Accounts
Ensure that you are logged in to both your source account (where the playlist currently exists) and your destination account (where you want to transfer the playlist).
Step #2: Make the Playlist Collaborative
In your source account, find the playlist you want to transfer. Right-click on the playlist name and select "Make Collaborative". This action enables other accounts to contribute to the playlist.
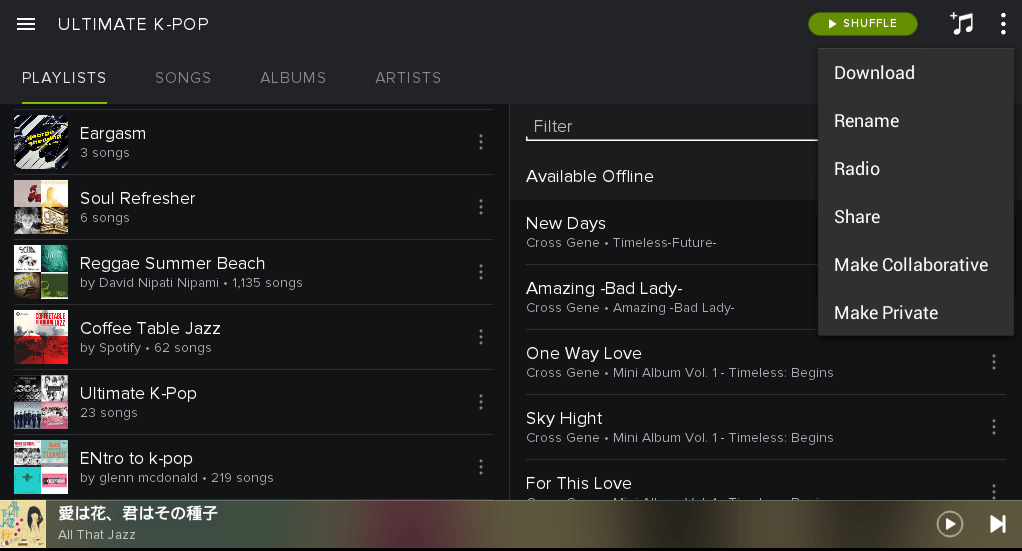
Step #3: Add the Destination Account to the Playlist
While the playlist is still open, search for your destination account in the search bar. When it appears in the search results, click on it to open the account's profile.
Step #4: Follow the Destination Account
On the profile page of the destination account, click the "Follow" button to add it to your network.
Step #5: Share the Playlist
Back on the playlist page, you should now see the destination account listed as one of the collaborators. Click on the three-dot menu next to the playlist name and select "Share" from the options.
Step #6: Send the Playlist Link
A pop-up window will appear with various sharing options. Choose the "Copy Playlist Link" option, and then share the link with the destination account. You can send it through a messaging app, email, or any other preferred communication method.
Step #7: Accept the Playlist Invitation
Switch to your destination account, open the shared playlist link that was sent to you, and click the "Follow" button. This will add the playlist to your library.
Step #8: Leave Collaborative Mode (Optional)
If you prefer not to keep the playlist collaborative after the transfer, you can go back to your source account, right-click on the playlist, and select "Make Non-Collaborative".
And that's it! By using Collaborative Playlists, you efficiently transfer Spotify playlist to another account without any fuss. Your playlist remains intact with all the customizations and order of tracks preserved.
Now, you can enjoy your favorite tunes on your new Spotify account, keeping the musical journey alive and uninterrupted. If you have multiple playlists to transfer, you can follow the same steps for each one, making the transition to your new account a breeze.
Part #2: How to Transfer Spotify Playlist to Another Account Using A Third-Party Tool
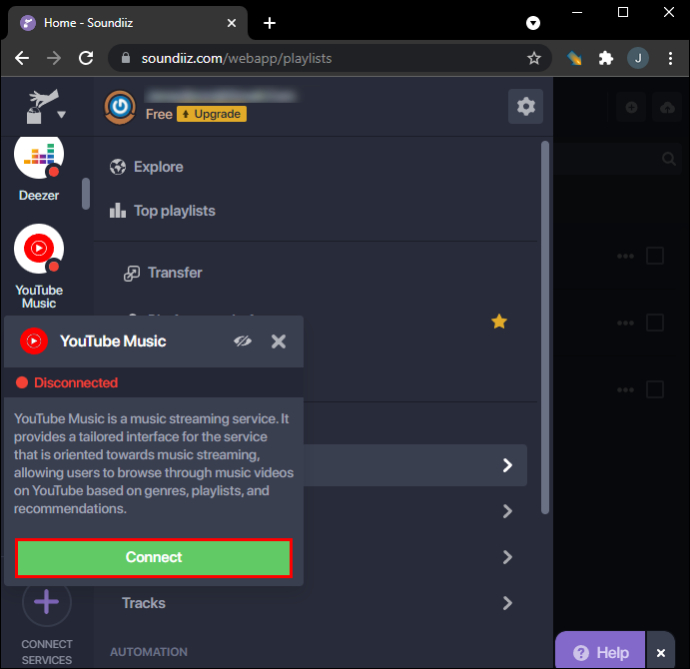
In addition to the manual method and collaborative playlists, there are third-party tools available that facilitate the seamless transfer of Spotify playlists between accounts. These tools, such as TuneMyMusic and Soundiiz, offer user-friendly interfaces and automation to simplify the process.
Here, we'll explore the pros and cons of using third-party online Spotify to MP3 conversion tools to transfer Spotify playlist to another account:
TuneMyMusic:
Pros:
- Ease of Use : TuneMyMusic provides a straightforward and intuitive platform that requires minimal technical expertise. Users can easily navigate through the steps without any hassle.
- Wide Platform Support : TuneMyMusic supports not only Spotify but also various other music streaming platforms like Apple Music, YouTube, Amazon Music, and more. This versatility allows users to migrate playlists between different services as needed.
- Bulk Transfer : With TuneMyMusic, you can transfer multiple playlists at once, saving time if you have numerous playlists to move.
- Playlist Customization : The tool often retains playlist order, metadata, and other customizations during the transfer process.
Cons:
- Internet Connection Required : As TuneMyMusic is an online service, it requires a stable internet connection to function properly.
- Free vs. Premium Features : Some advanced features may be limited to premium accounts, potentially requiring a subscription to access the full functionality.
Soundiiz:
Pros:
- Vast Platform Compatibility : Soundiiz is compatible with an extensive range of music streaming platforms, making it a versatile tool for playlist migration across various services.
- Automatic Sync : Soundiiz can synchronize playlists between connected accounts, making it easy to keep playlists up-to-date on multiple platforms.
- Various Management Options : The tool offers playlist management features like merging, deduplicating, and converting playlists, providing users with more flexibility and control over their music library.
- Batch Transfers : Soundiiz allows users to transfer multiple playlists simultaneously, streamlining the process for those with extensive collections.
Cons:
- Subscription Requirements : Some features may be limited to premium users, and extensive playlist transfers may necessitate a paid subscription.
- Learning Curve : While Soundiiz is user-friendly, new users might require some time to fully explore and utilize all its features effectively.
Note: When using third-party tools to transfer Spotify playlist to another account, it's essential to be cautious with your login credentials and ensure you're using reputable services to protect your account security and data privacy.
Third-party tools like TuneMyMusic and Soundiiz offer convenient solutions for transferring Spotify playlists to another account. They provide efficient methods to preserve playlist order, metadata, and other customizations, saving users time and effort.
While these tools offer significant advantages, it's essential to be mindful of any limitations and consider potential subscription requirements for full access to all features. Always choose a reliable and trusted service to ensure the safety of your account information during the playlist transfer process.
Part #3: The Best Way to Keep Your Spotify Playlists: Spotify Music Unlocker
If you're looking for the ultimate solution to keep your Spotify playlists safe and accessible without the need to transfer Spotify playlist to another account, consider using Spotify Music Unlocker.
Unlike manual methods or third-party tools, Spotify Music Unlocker allows you to maintain full control over your playlists, regardless of account changes or platform switches.
Spotify Music Unlocker enables you to access your playlists seamlessly, regardless of the Spotify account you're using or the platform you're on. This means you won't have to go through the hassle of transferring playlists or using different tools to sync your music across multiple accounts. Your playlists remain intact, ready to be played whenever you want.
With Spotify Music Unlocker, you're not tied to any specific Spotify account. You can use the service to manage and listen to your playlists without being dependent on a particular account. This independence is especially beneficial if you ever decide to change your main Spotify account or create a new one.
Here are the steps to use it:
1. Launch the Spotify Music Unlocker tool.
2. Click the "Open Spotify Web Player" button.
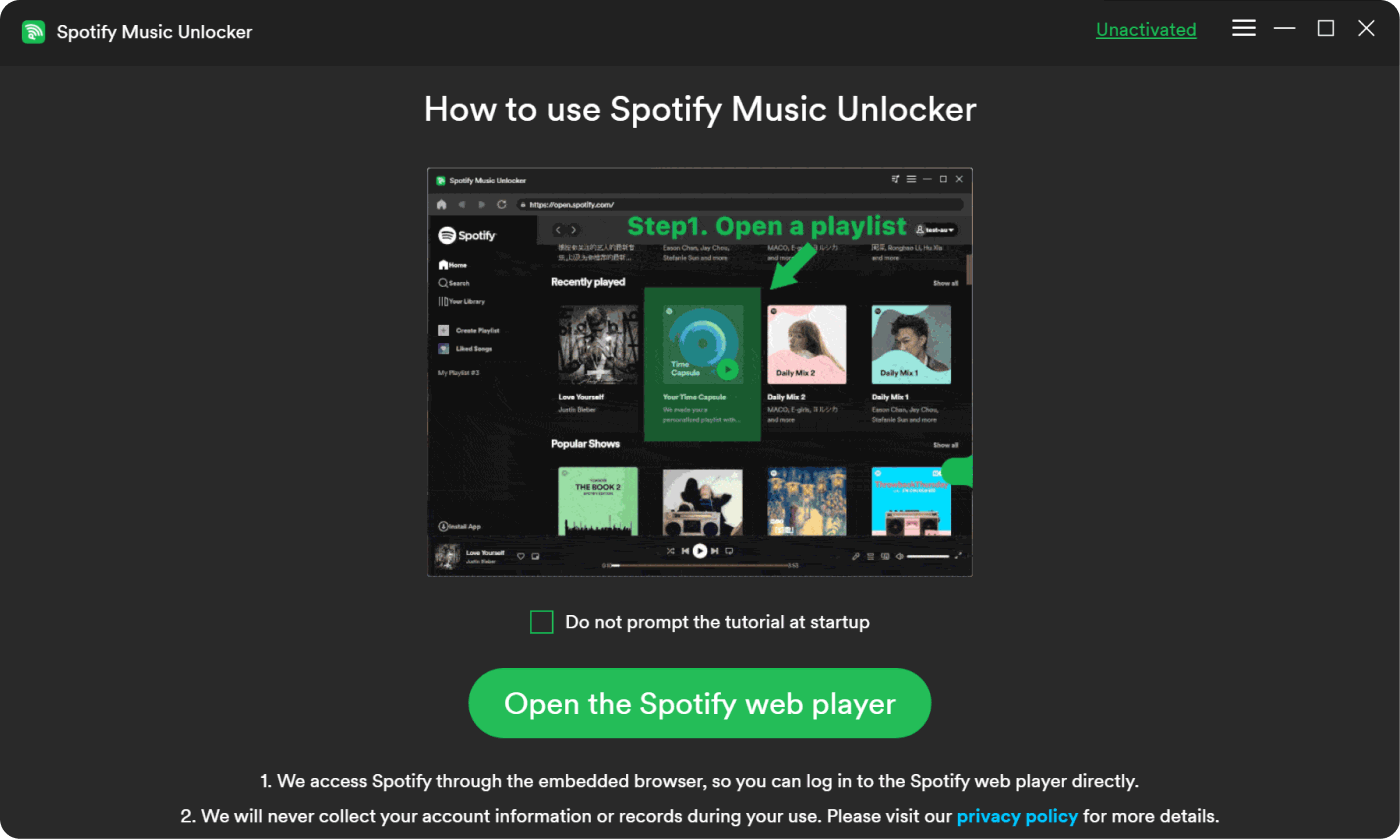
3. Sign in to your Spotify account or create a new one.
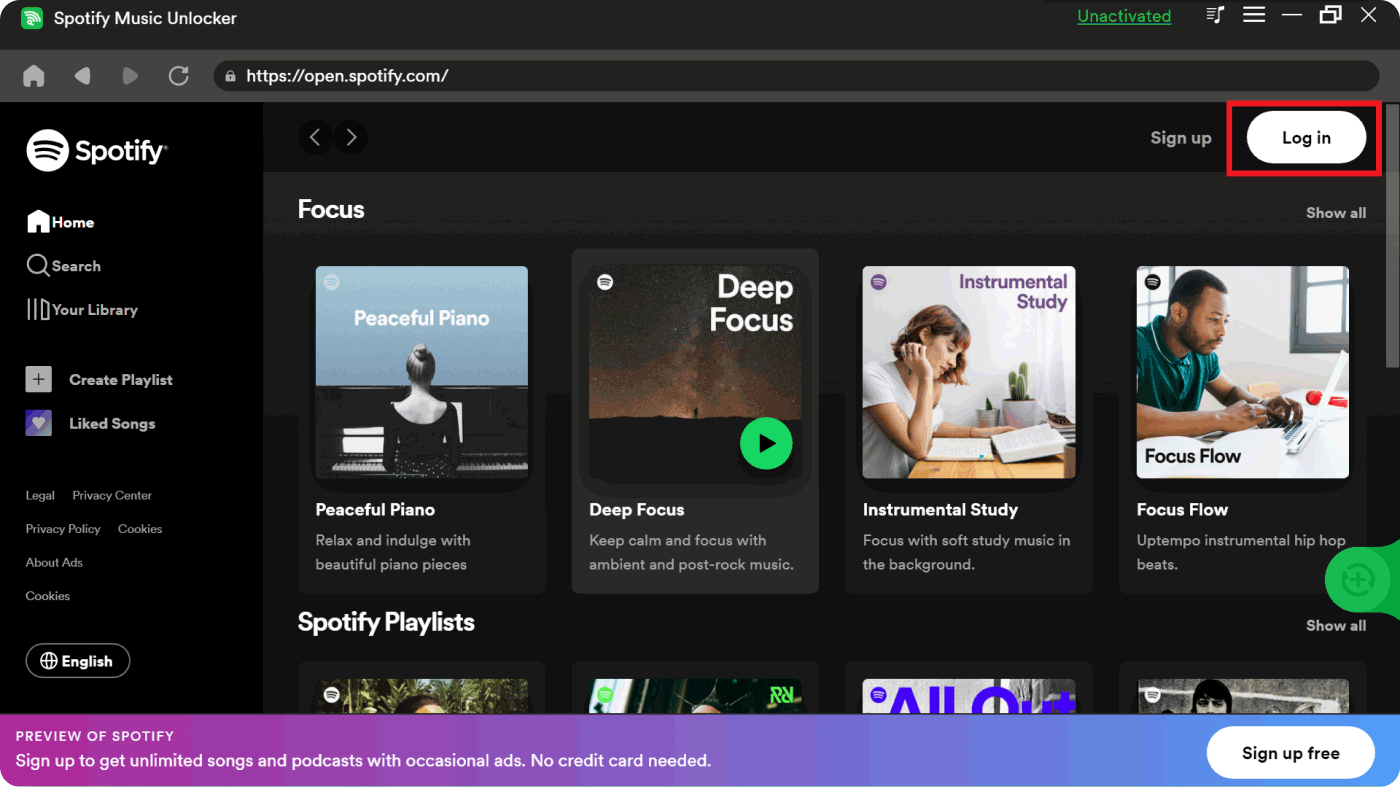
4. To add a podcast, album, or playlist to the conversion list, click the green "Add" button or drag and drop it onto the green "Add" symbol.
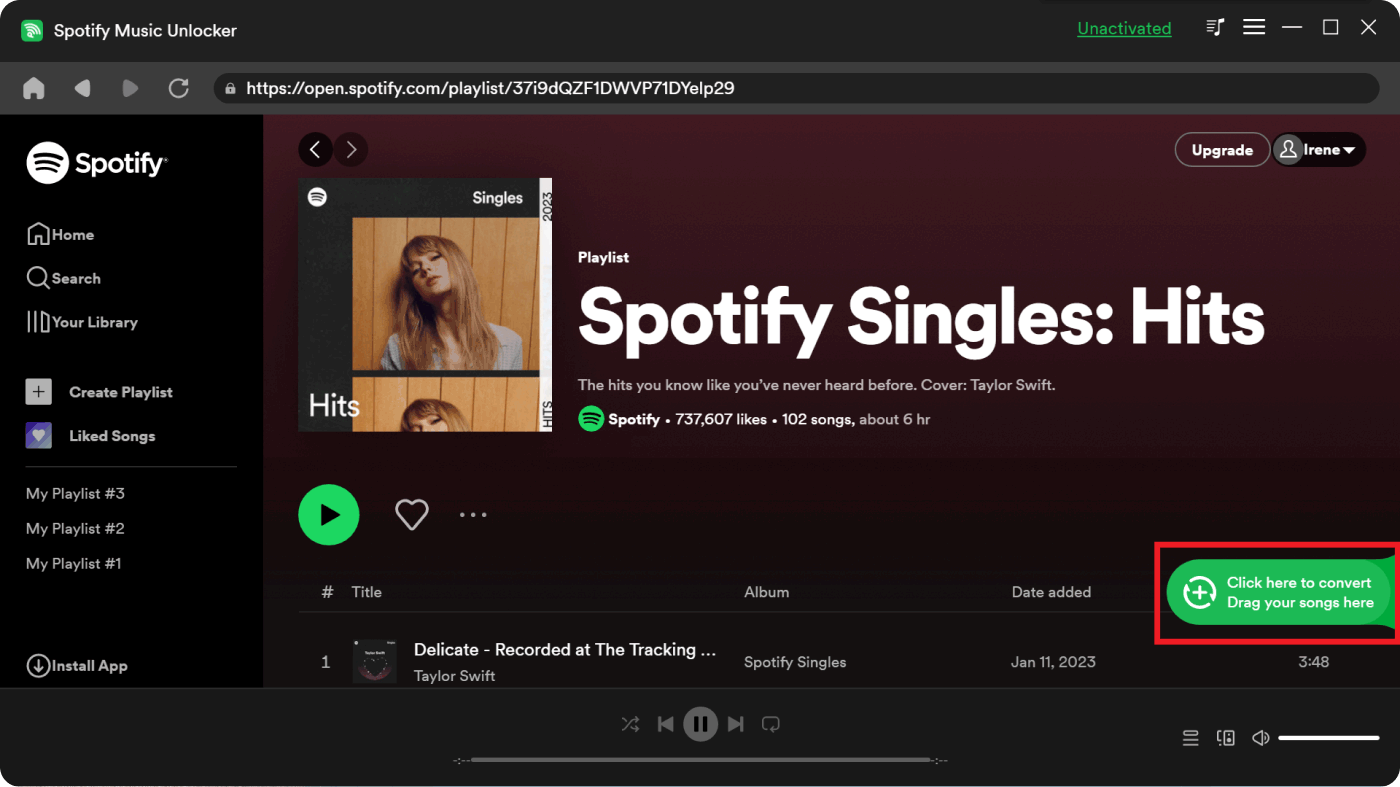
5. To add a single song or podcast to the conversion list, drag and drop it onto the blue symbol.
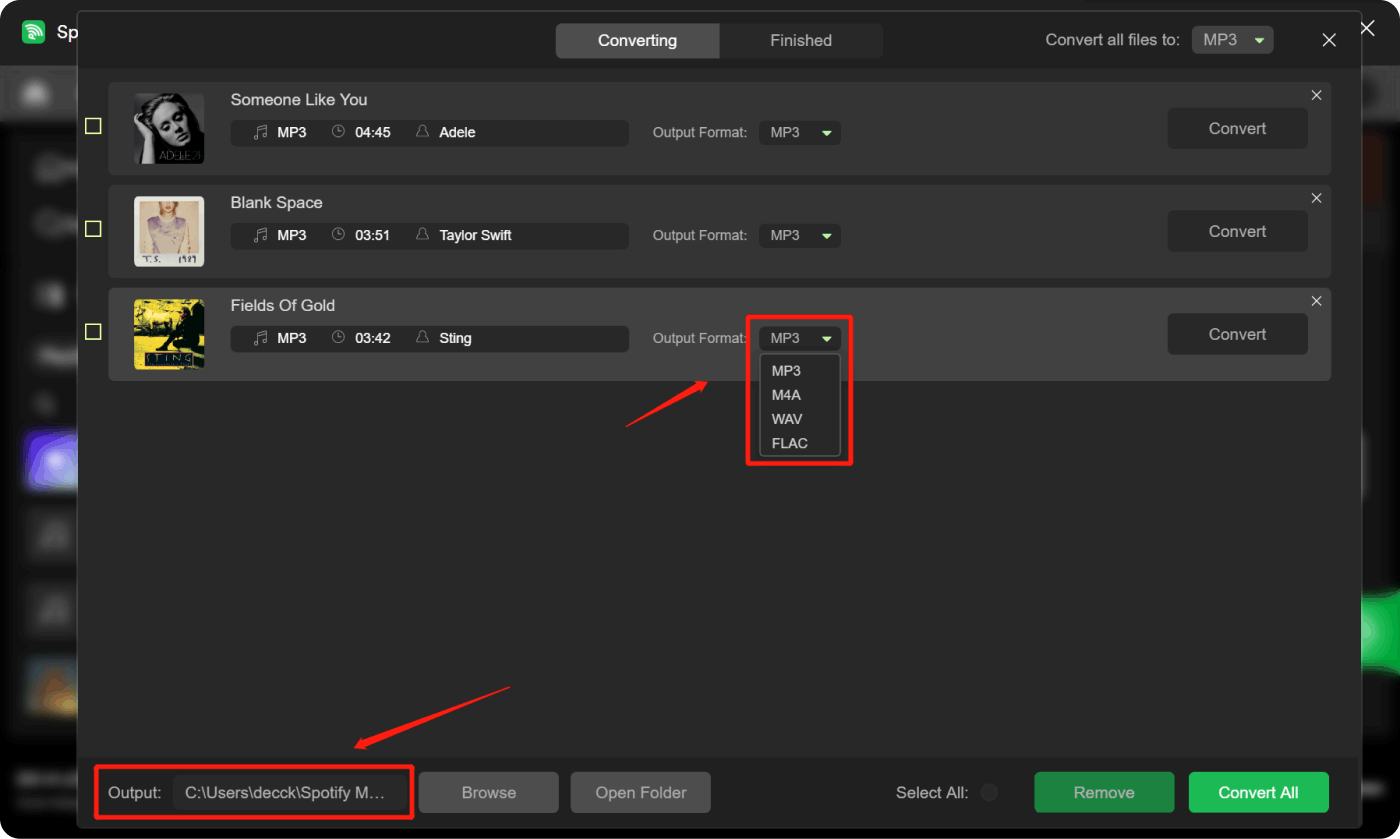
6. Select your desired output format, such as MP3, M4A, WAV, or FLAC. You can also specify the destination folder where the converted files will be saved.
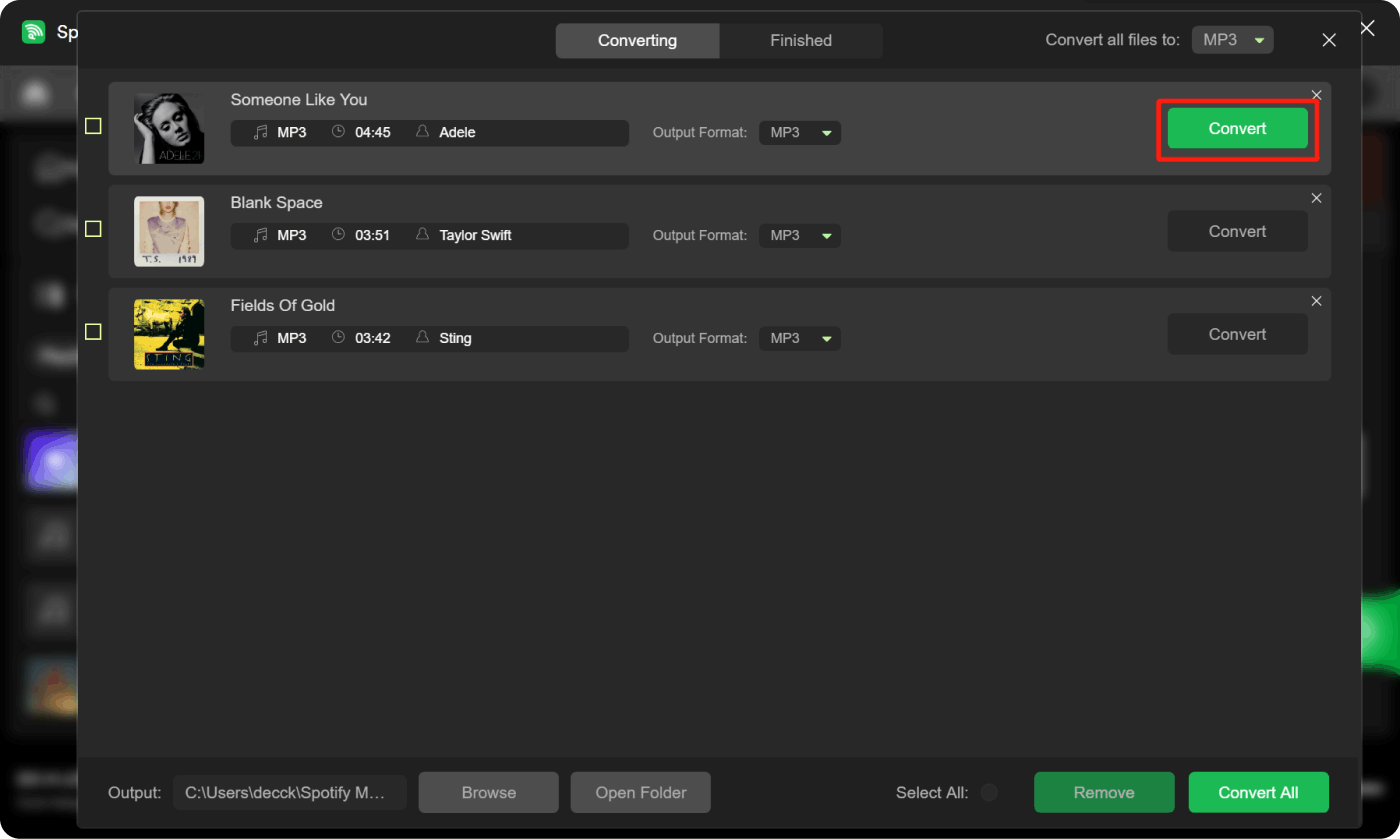
7. To start the conversion process, select one or more tracks from the conversion list and click the "Convert" button.
Spotify Music Unlocker offers offline access, allowing you to download your Spotify playlists to MP3 format for listening when you're not connected to the internet. This feature is particularly useful for those who want to enjoy their favorite tunes on the go without worrying about data usage.
By utilizing the reputable Spotify Music Unlocker, you can enhance the security of your playlists. These services are designed to protect your data and privacy, ensuring that your valuable playlist content remains safe and secure.
People Also Read How to Move Spotify Music to SD Card: Only Guide You Need! How to Sync Spotify to Apple Watch: A Step-by-Step Guide
Written By Rosie
Last updated: 2023-07-19