As a music lover, you probably have stored thousands of music files on your iPhone, and of course, it would be lovely to play them on your smartwatch as well. This is why it would be essential to figure out how to transfer music to Fitbit Versa from iTunes.
It would be helpful to know that you are allowed to download about 300 songs on your Versa, but the transferring would only be possible if the music files that you are about to transfer do not have any restrictions.
So, as a result, music files that you can access through online music platforms like Spotify and Apple Music are not supported by Versa. You have to do something with the protection they have so that you can freely access the songs on your Fitbit Versa.
In this article, we are going to help you figure out methods or steps about how can we transfer music to Fitbit Versa from iTunes. There are also facts about Fitbit Versa that we are going to unfold, so if you are interested in getting one, this article might help you consider factors that can be your guide in purchasing one, in the future.
Contents Guide Part #1: Getting to Know the Fitbit VersaPart #2: Ways to Transfer Music to Fitbit Versa from iTunesPart #2: What Is the Easiest Way to Transfer Music Files from iTunes to Any Device?Summary
Part #1: Getting to Know the Fitbit Versa
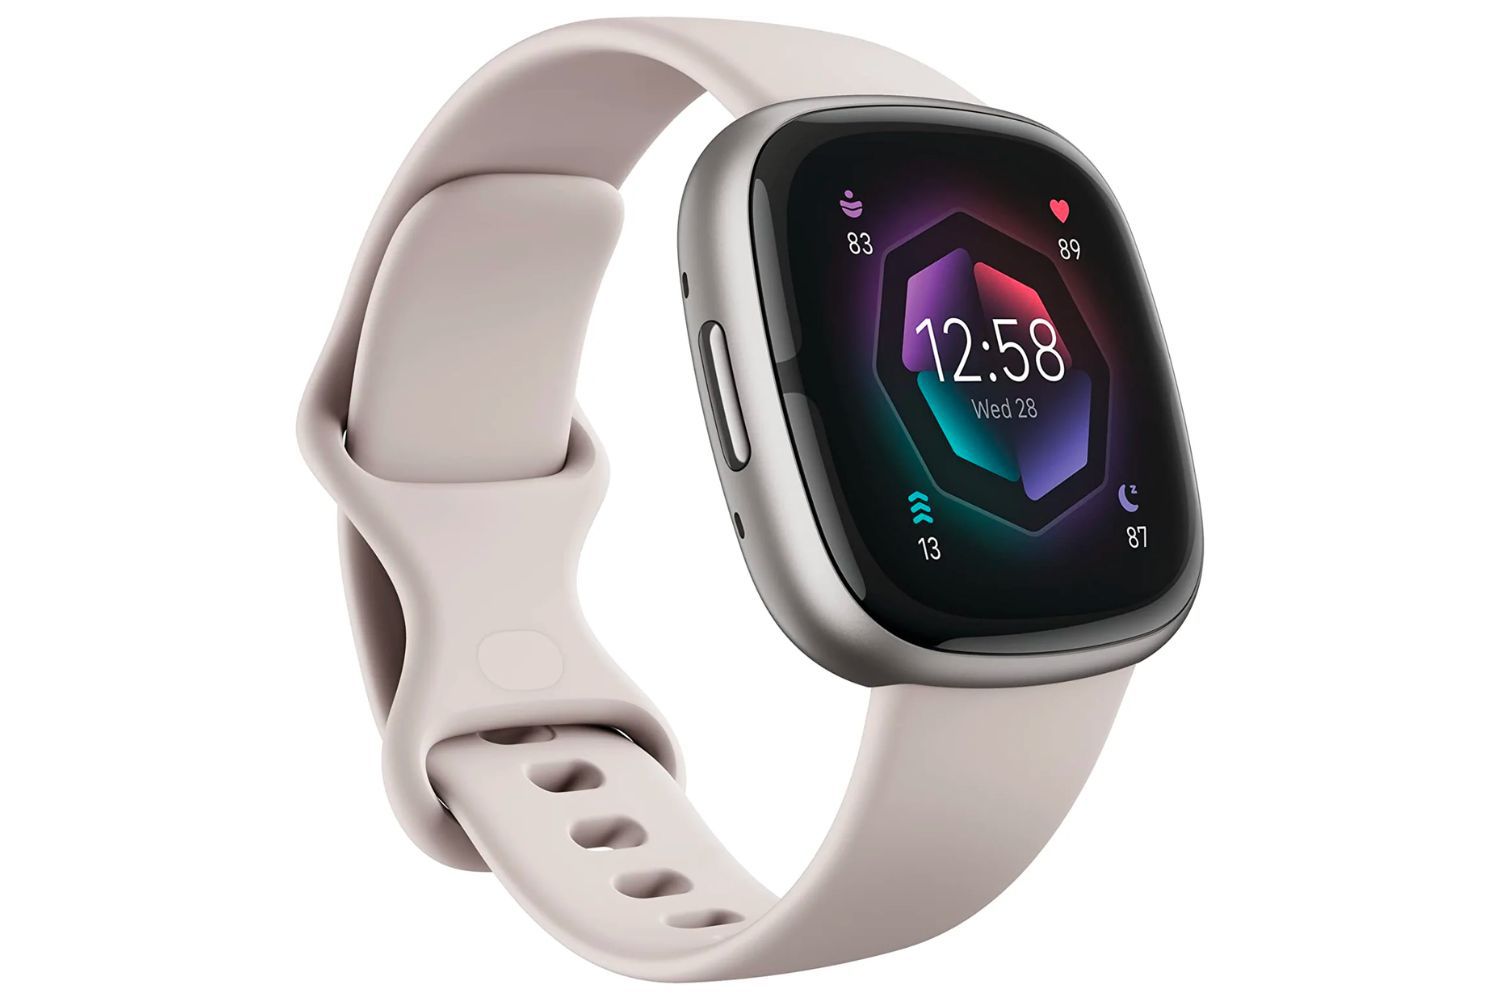
There are lots of smartwatches on the market, but there is nothing like the Fitbit Versa. This watch can assist users get into shape and live a healthier and more pleasing life. This device or wearable which can last up to four days is able to store over 300 music files, it also has a very approachable method in health and fitness which allow users to be more of themselves, as they use it.
Aside from being a partner to a healthier life, the watch has a feature where you can conveniently do contactless payments whenever you buy things. There are also other apps within the watch, and you can also change watch faces, and access notifications on it.
If you are a swimmer, you can definitely wear the Fitbit Versa, and it also has a heart rate tracking function that can help you monitor your health as well. This watch is really one of the greatest smartwatches, and it would be a great thing to figure out how to transfer music to Fitbit Versa from iTunes as well. Some of the media formats that you can access using the Fitbit Versa watch are MP3, MP4, WAV, WMA, etc.

Part #2: Ways to Transfer Music to Fitbit Versa from iTunes
Let us now identify some of the methods on how to transfer music to Fitbit Versa from iTunes. We have created a list of them below, with all the procedures that are needed to follow as well.
Use the Fitbit Connect App
In order to use this method, you need to make sure that you have already exported music tracks from your iPhone to your computer, only then you can proceed with the transfer. The task would run by adding songs to the Fitbit playlist and then start syncing it to the Fitbit Versa in order to start the transferring and make things run well, now let us see how we can start doing it, below.
- Get your computer and start downloading and installing the Fitbit app on it. Then, using your credentials you need to sign in to your account in Fitbit which is also the account that is signed in to your smartwatch.
- Then, you have to make a playlist with the songs from your iPhone that you have exported to your computer, then add the said playlist to your Fitbit app.
- Make sure that your computer and your Fitbit Versa are connected to the same Wi-Fi network.
- Then start downloading and installing the Fitbit Connect on your computer.
- Start syncing your Fitbit Versa in your Fitbit app, and then turn off the Bluetooth on your phone and computer. Then, you need to make sure that you insert your Fitbit Versa into the charger so that it won’t turn off while we are in the process.
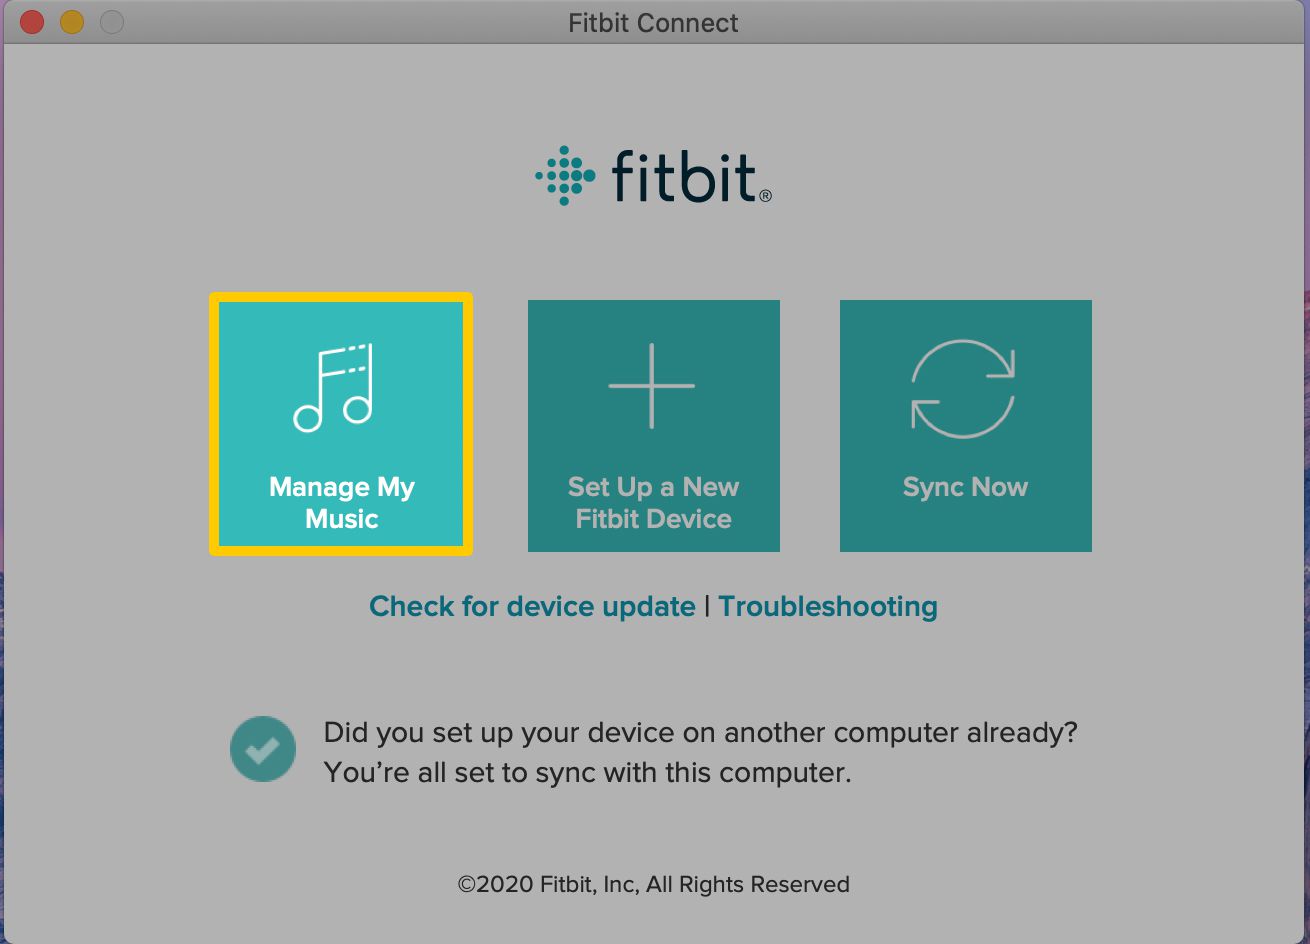
- Start running the Fitbit Connect app, and then choose the “Manage My Music” option on your computer.
- Then on your Fitbit Versa, open the Music app, and then choose the “Transfer Music” tab. It is needed that you have to drag it down in order to view the transfer button and wait for the connection to your computer. The said scenario will take a few moments.
- You will see on-screen instructions on your computer, and they are intended to choose the playlist that you have made using iPhone songs and by doing so, music tracks will then be downloaded to your Fitbit Versa.

Using iTunes Directly
We can also use iTunes directly as one of the methods of how to transfer music to Fitbit versa from iTunes. But, in order to proceed, it is a must to know that the music files on iTunes are purchased from the iTunes store, and it is only then possible to make use of the syncing function of the iTunes app. So, how can we do it, let us check out the steps below.
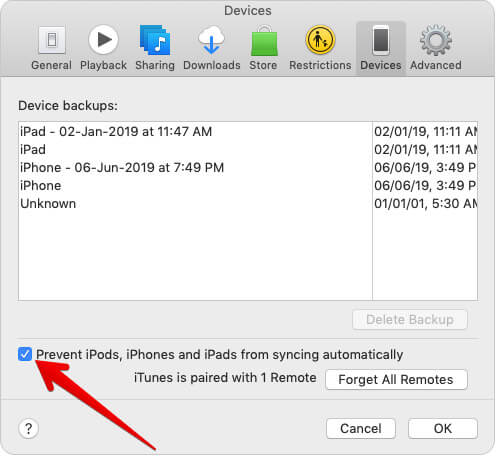
- Connect your iPhone to your computer with the help of the USB cable, and then start opening the latest version of the iTunes app on your computer. In order to proceed tap “Edit”, and then hit “Preferences”, and then tap “Devices” as you see it on your panel or screen. Then, go and select the “Prevent iPods, iPhones, and iPads from syncing automatically” option, in order to check.
- Proceed to the iTunes Store, and then choose the “Authorize This Computer” option, you also have to make sure that you use your Apple ID and password in order to finalize this step. Once done, tap on “File”, and then go to “Devices”, and then select the “Transfer Purchases from (device name)” option, these must be done in order.
- Start opening the iTunes menu bar and then tap “Edit”, and then the “Preferences” option, after that tap the “Advanced” tab, and then you are able to see the iTunes Media Folder which is under the “iTunes Media folder location” option.
- Then go to the iTunes Media folder in order to start copying and pasting the purchased iTunes music to the local folder of your computer.

Use iTools
Another method of how to transfer music to Fitbit Versa from iTunes is through the use of iTools. You can also use it to transfer voice memos, videos, photos, cooks, contacts, apps, files, and documents from your iPhone to a computer at a high speed. Once done, you are able to use the Fitbit Connect to add iPhone music from your computer to your Fitbit Versa, more conveniently. Now, let us check the procedures, below.
- To begin, you have to run iTools on your computer using the appropriate USB cable. By doing so, iTools will start recognizing your iPhone automatically.
- Once the connection is successful, tap the tabs for Device, and then go to Music, and then hit Music once more. Once done, you are able to see the songs on the list which is located at the right part of the window.
- Tap on the name of the song and then tap the “Export” button. If you want to transfer all the songs you love to your computer from your iPhone, choose the box which is located at the top in order to select all and then choose all and tap the “Export” tab in order to transfer all the songs at once.
These are only some of the ways how can we transfer music to Fitbit Versa from iTunes, there are other methods that you can look up on the web, and try as well. But the best way to transfer music files to any device you have is still possible, and we are about to discuss this method in the next part of the article.
Part #2: What Is the Easiest Way to Transfer Music Files from iTunes to Any Device?
Now, let us talk about the best possible way to access music files from Apple Music and have these music files transferred to any device you have, such as the Fitbit Versa. This time, we need to use a tool, called the Apple Music Unlocker.
If you want something that will help you deal with all your dilemmas when it comes to music format compatibilities and DRM encryption, we have this tool, this will also help you easily deal with how to transfer music to Fitbit Versa from iTunes.
It is a professional tool that you can use to convert and unlock Apple Music tracks so transferring to any device you have, such as the Fitbit Versa, is possible. Through the use of this tool, you can transform your Apple Music tracks into formats like MP3, WAV, M4A, and FLAC.
In order to get this professional tool, you need to get the download package as all the instructions are included here. You have the option to get the free trial or to officially register the tool if you want. It has a 30-day free trial offering which would be good if you want to have a glimpse of what the tool can do.
You just have to register the tool, and once you have successfully done it, then, you can proceed with the conversion process by following the steps that we have below.
Step #1: Start Opening the Apple Music Unlocker
You need to install iTunes on your PC and open the Apple Music Unlocker. Then, once you have opened it, choose the “Open the Apple web player” option which you will see on the main page of the tool.
Step #2: Start Signing In to Your Apple ID Account
At the top right part of the interface, you will see the “Sign In” option and you have to tap it in order to start signing in to your Apple ID account. All your information is safe with Apple Music Unlocker, so there is no need to worry about it.
Step #3: Add All the Songs And the Playlists That You Want
Choose the specific songs or playlist by starting to drag the playlist or the song title to the red add icon. You can also alternatively launch a playlist, and then hit the red add icon in order to add all the songs from a specific playlist to a list. In case you worry about any duplicates, the tool will automatically take care of it, so you can feel at ease.
Step #4: Choose Your Output Settings
For the fourth step, you can now choose your desired format, you can choose from FLAC, M4A, WAV, or MP3. Then you can also set the output folder to where are you going to save your files after the conversion.
Step #5: Tap the Convert Button
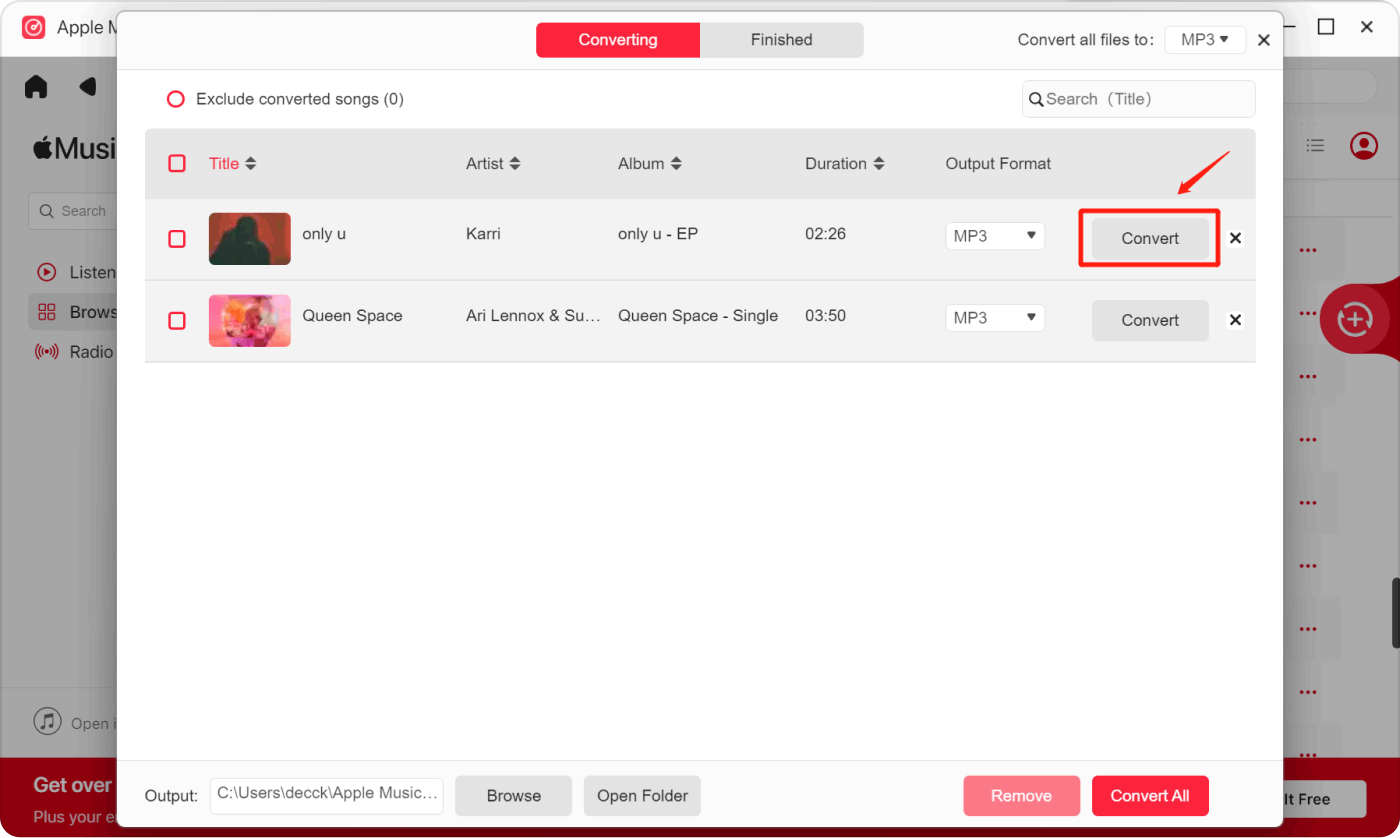
The last step is to hit the “Convert” tab and wait for a few minutes until the process is over. You can also tap the “Convert All” button if you want to convert multiple songs!

People Also Read How to Sync Spotify to Apple Watch: A Step-by-Step Guide Guide: How to Transfer Playlists from Spotify to Apple Music
Summary
There are various ways how to transfer music to Fitbit Versa from iTunes, and we just had a discussion of some of them in the previous parts of the article. We hope that all the methods that we have discussed above, will help you be able to access Apple Music tracks you love right on your wrist through the use of the Fitbit Versa.
And in order to help you even better, we have also introduced the Apple Music Unlocker, and this professional tool will help you step up the game, and play your Apple Music tracks on any device you own such as iPod, iPod Touch, and so on. What are you waiting for? Come get it!
Written By Rosie
Last updated: 2023-07-17