Spotify is definitely one of the leaders when it comes to offering great music streaming services to music enthusiasts around the world. What even makes it more worthwhile to use is that it has a free version aside from the available paid plans that are being offered.
However, even if a subscriber has the ability to download Spotify songs to MP3 for offline streaming, using these tracks outside the app isn’t permitted. This, makes some users wonder about several things such as how to set ringtone from Spotify.
Indeed, it would be amazing if you can get to listen to your favorite Spotify song every time somebody calls you on your mobile phone. Apart from this, in a huge crowd, you won’t be confused given that most are probably using default ringtones. Jump into the first part right away to start finding out relevant information relating to this process.
Contents Guide Part #1: Is it Possible to Use Spotify Songs as Ringtones?Part #2: Unlock Spotify Songs to Finally Make Them RingtonesPart #3: Setting the Converted Spotify Songs as RingtonesPart #4: Summary
Part #1: Is it Possible to Use Spotify Songs as Ringtones?
“Can we use Spotify songs as ringtones?”
Well, as you may have also understood from the introduction part, it is definitely possible to use your Spotify favorites as your phone’s ringtones. It’s just that it must be clarified that doing so directly isn’t possible given that the songs are protected by DRM. With this encryption, the tracks can’t be accessed on unauthorized devices and can’t be modified or altered.
This is being used by content creators to protect their works from illegal use and distribution. But since our goal here is to learn how to set ringtones from Spotify for personal use, there shouldn’t be any issues with bypassing this protection. The only remaining question would be “how it can be done”.
Again, it must be reiterated that being a Premium Spotify user does not guarantee one the capability to use the tracks outside the app. In fact, once the subscription has been canceled, all the previously downloaded tracks will also be gone and can no longer be accessed.
The most significant step is to work on the removal of the tracks’ DRM protection. We will be getting into that discussion as we move into the next section of this post.
Part #2: Unlock Spotify Songs to Finally Make Them Ringtones
In order to finally start with the process of how to set ringtones from Spotify, the first thing that must be accomplished is to get rid of Spotify songs’ protection. Thankfully, there are tools like Spotify Music Unlocker that can help unlock the tracks and transform them into formats including FLAC, WAV, M4A, and, of course, MP3:
In order to start using Spotify Music Unlocker, it must be downloaded and installed first.
Once the Spotify Music Unlocker has been up and running, what must be done next is to proceed with registration. Upon buying the license from the official website, a license key shall be sent to the registered email address. This will be used during the registration process.
Step #1: Open Spotify Music Unlocker and then tap the “Unactivated ” option.
Step #2: Input the email address you used during the purchase made and the license key that was given.
Step #3: Finally, to complete the registration process, hit the “Activate ” button.
If you would want to get the full version of the app but don’t have the license yet, just click the “Buy Now ” menu from the pop-up window on the screen. It is also good to note that you can use this app for free for 30 days (free trial offer). Registering it shall let you access its full version.
Once the downloading, installation, and registration processes have been completed, the app shall now be ready for use. To give you a guide of how the conversion works via the Spotify Music Unlocker, the below guide was created. Accomplishing the steps below shall be the first step to the process of how to set ringtones from Spotify.
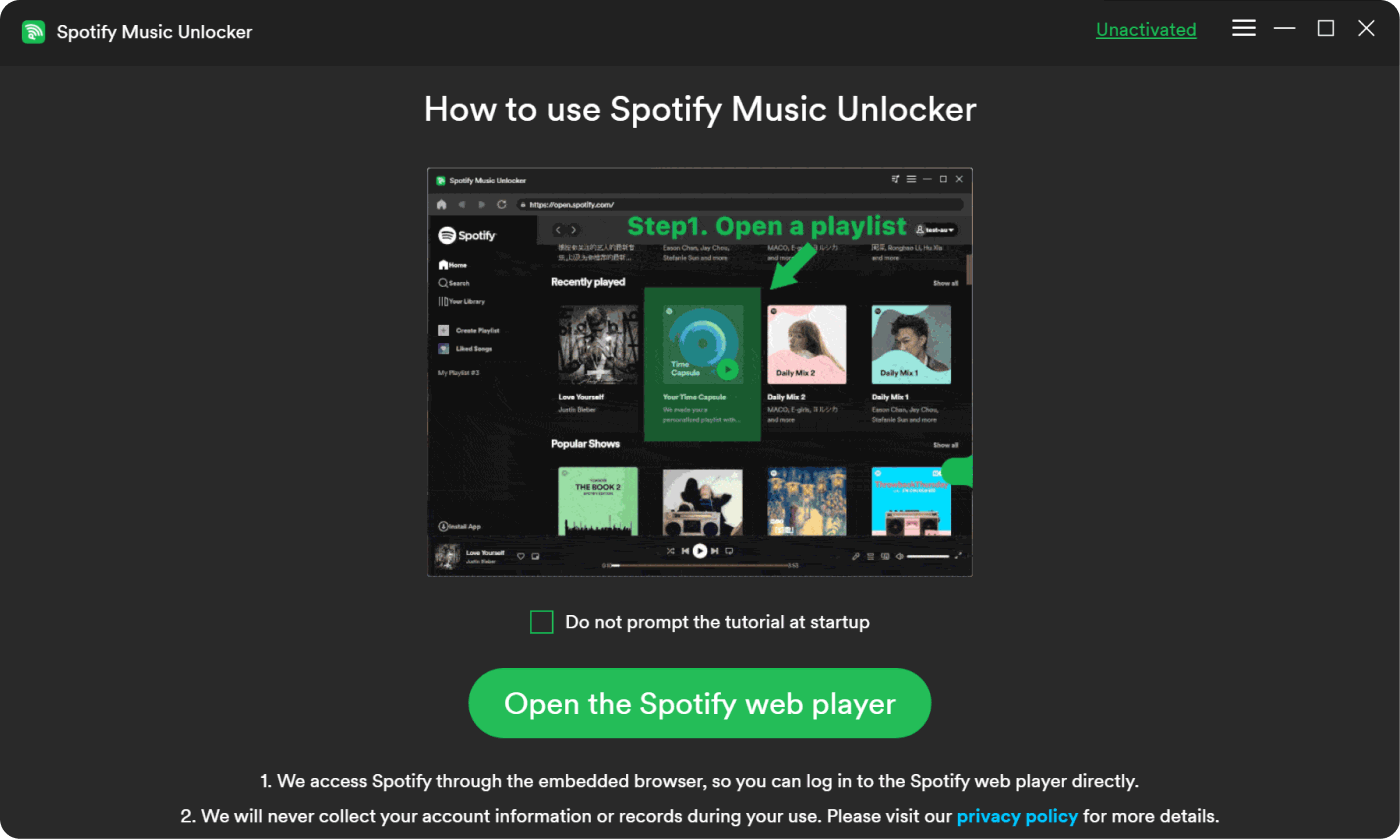
Step #1: Tap the “Open the Spotify web player ” button from Spotify Music Unclocker’s main page.
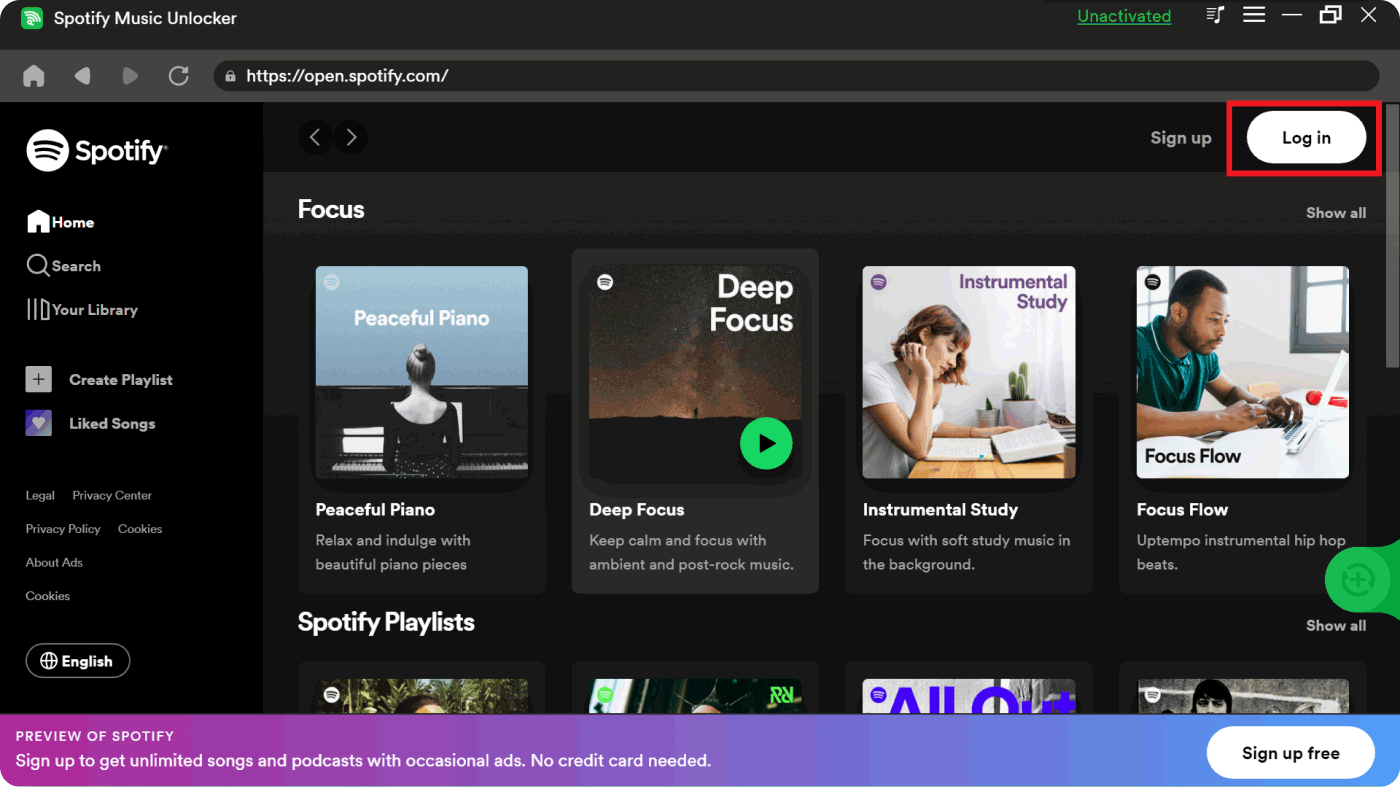
Step #2: In order to sign into your Spotify account, tap the “Sign In ” button and provide your account credentials to proceed. Else, tap the “Sign Up ” button in case you don’t have an account yet.
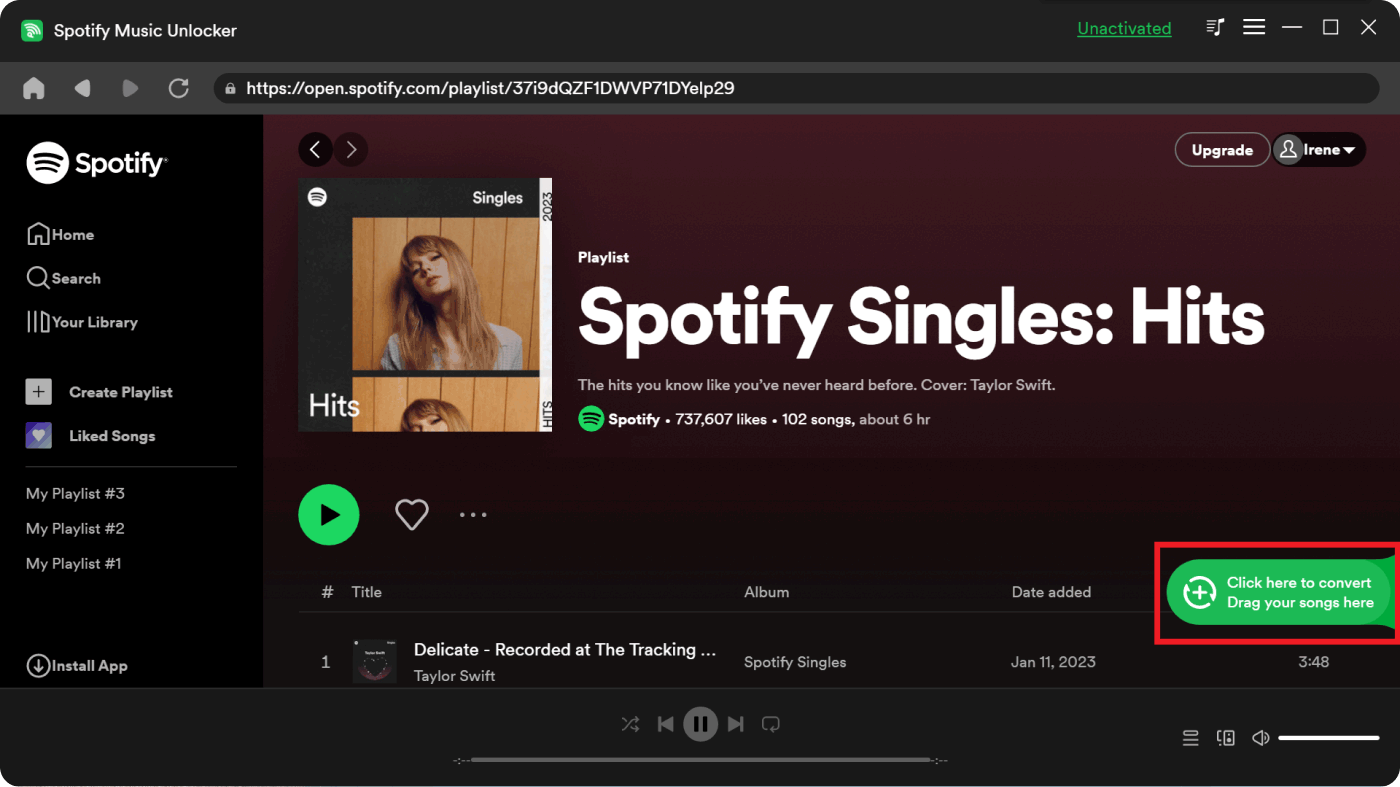
Step #3: Choose the specific tracks, albums, or playlists that you would like to be processed through the app. Afterward, tap the green icon on the side to add the selected content. Dragging and dropping the songs will also be fine. You don’t have to worry about possible duplications as Spotify Music Unlocker shall automatically detect them.
Step #4: Select the output format that you’d like to use via the dropdown menu under the “Output Format” option. If needed, ensure to also select the output folder to use.
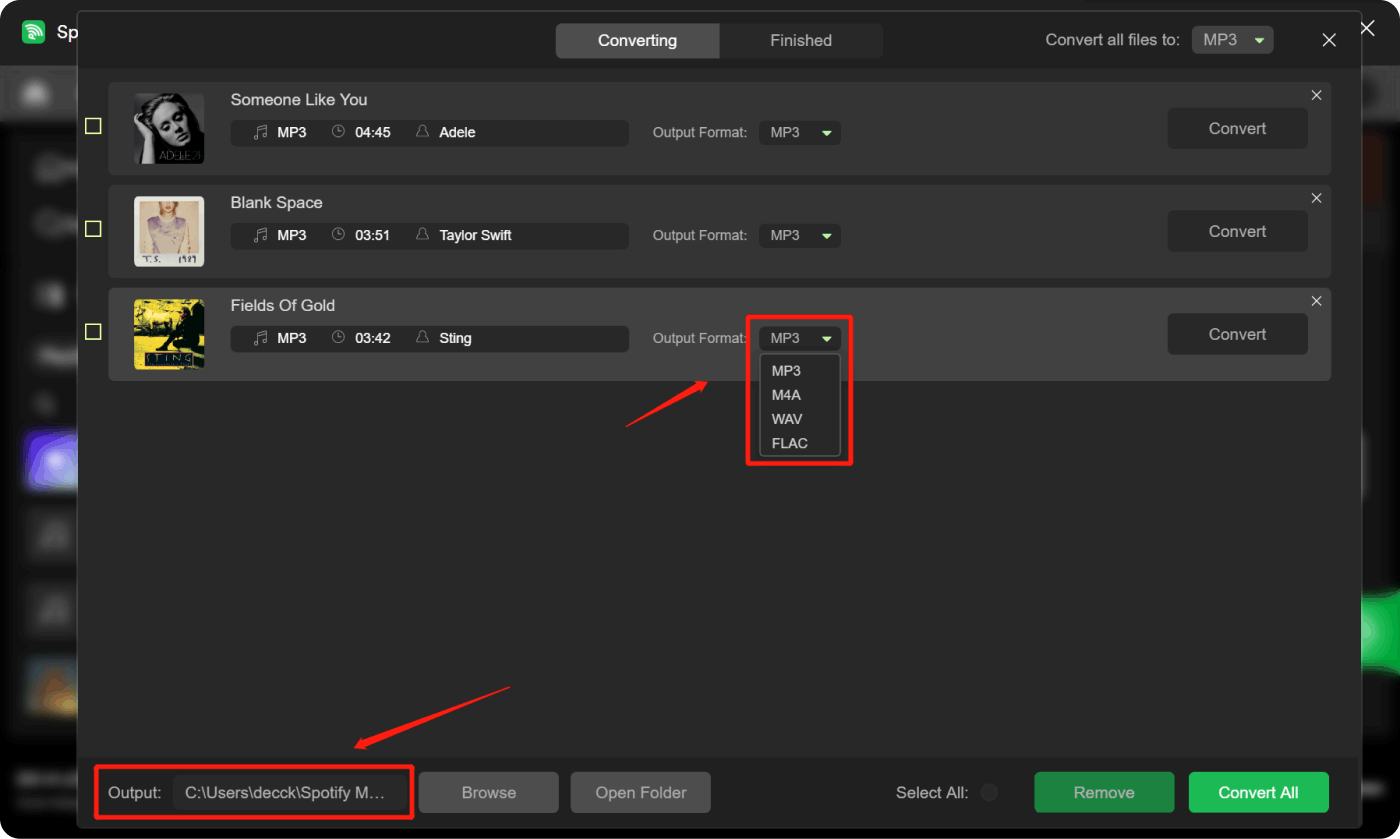
Step #5: The conversion via this app shall begin once the “Convert ” or “Convert All ” button has been ticked off.

If you’d like to view the list of the output files, you just have to go to the “Finished ” tab and then press the “View Output File ” menu afterward.
As simple as following the procedure presented here, you will get unlocked or DRM-free Spotify songs. Now, since the tracks are already free from protection, we may now proceed with the next step. We will be highlighting the procedures both for iPhone and Android phone users.
Part #3: Setting the Converted Spotify Songs as Ringtones
Upon unlocking the specific Spotify songs that you’d like to use as your phone’s ringtones, we will now be proceeding with the next step to complete the process of how to set ringtones from Spotify. Since the tracks are now free from protection, using and accessing them on apps or devices that you own would now be possible.
Using iPhones
If you are an iPhone user, you may use the iTunes app to create a ringtone using the transformed Spotify song. Here are the steps that you must do.
Step #1: Open the folder that contains the converted Spotify tracks. Cut the track and just leave the part that you wish to use as your iPhone’s ringtone. You may use your preferred ringtone maker. Remember to keep the audio clip at most 40 seconds in length.
Step #2: The next step to do is to add the edited clip to your iTunes library. Once added, select the song, and then tap the “File ” button at the top menu. Choose the “Convert ” option next before tapping the “Create AAC Version ” menu.
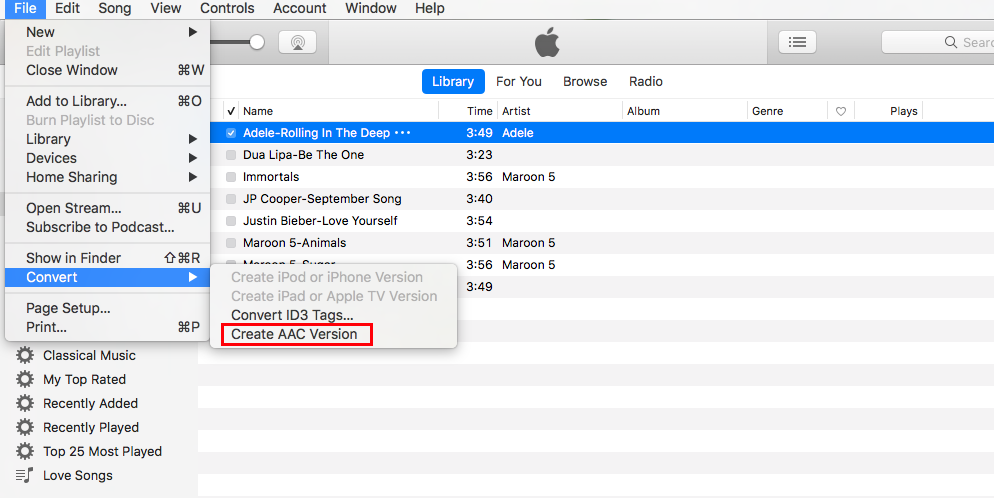
Step #3: Once the AAC version has been made, copy it and save it on your PC. Make sure to rename it and put .m4r as the file’s extension.
Step #4: Connect your iPhone to your PC via a USB cable. Wait until your device has been recognized by the iTunes app. Tap its icon afterward.
Step #5: Look for the “On My Device ” section and then select the “Tones ” menu. Just drag the edited Spotify song into this section so they can be synced to your iPhone.
Step #6: On your iPhone, head over to “Settings ”. Look for “Sound & Haptics ”, and then “Ringtone ”. You just have to set the edited Spotify song as your iPhone’s ringtone then.
Using Android Phones
In the case of how to set ringtones from Spotify on Android phones, below are the steps to be done. Just makes sure that the tracks are in WAV, M4A, or MP3 formats as these are the most common formats supported by Android devices.
Step #1: Using a USB cable, connect your Android device to your PC to transfer the converted Spotify tracks.
Step #2: Go to your Android device’s “Settings ”, then look for “Sounds & Vibration ”, then “Ringtone ”.
Step #3: Tap the “+ ” button at the top to add the transformed Spotify song that you’d like to use as a ringtone.
Step #4: To finish off, hit the “Done ” button.
People Also Read How to Add Music to Video from Spotify: The Ultimate Guide How to Add YouTube Music to Spotify: A Step-by-Step Guide
Part #4: Summary
The process of how to set ringtones from Spotify shall begin with removing the Spotify songs’ DRM protection for users to be able to use the tracks without limitations. This can be done through the help of Spotify Music Unlocker. Once the tracks are freed from protection, they can now be edited through several ringtone maker apps and then be set as ringtones on iPhones and Android mobile devices.
Written By Rosie
Last updated: 2023-07-20