Trusted computers can smoothly sync with your iPhone and access your media files like photos, videos, and other data such as contacts, and even create backups. “How can I bypass trust my computer with my iPhone ” is only asked for the first time that you connect your iPhone to the computer.
However, there are instances when this popup question is asked when you attempt to update or restore your previous iTunes library. Some users even reported that their screen was stuck in this message and couldn't go through.
Usually, this happens when the iPhone has a broken screen or is disabled. Read along to find out how to bypass this part.
Part #1: How Can I Bypass Trust My Computer with My iPhone via DFU Mode?Part #2: How to Select Trust This Computer on A Broken ScreenPart #3: How Can I Bypass Trust My Computer with My iPhone Disabled or Screen Broken in a Few StepsPart #4: Summary
Part #1: How Can I Bypass Trust My Computer with My iPhone via DFU Mode?
One of the quickest ways to bypass the Trust This Computer screen is to place the iPhone in DFU Mode. DFU or Device Firmware Update is a state wherein you can restore the iOS device at any condition.
This is done by bypassing the iBoot (an environment similar to BIOS in computers) and downgrading your firmware package.
To place your iPhone in DFU mode, follow these:
- Connect your iPhone via a USB cable to the computer
- Find and hold the buttons Power and Home for 5 seconds
- Keep holding them until you see that the screen turned black
- Let go of the Power button while still holding the Home button for 10 seconds
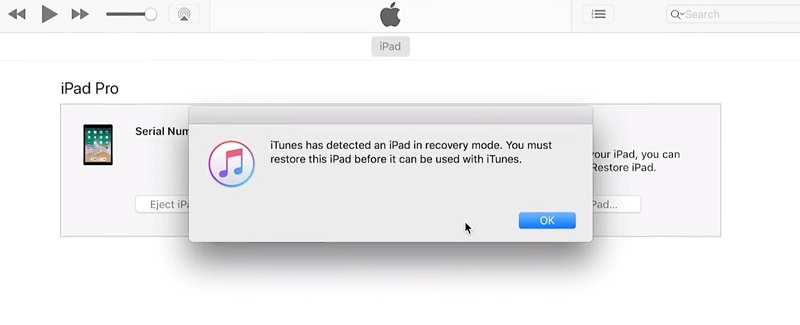
You will now see a popup window that says “iTunes has detected an iPhone in recovery mode. You must restore the iPhone before it can be used with iTunes.”

After you have entered the DFU mode, you also need to get out of it by doing these:
- Again press and hold the Home and Power buttons for 10 seconds
- Release the home button only until you see the Apple logo screen come on, indicating that your iPhone is rebooting
Part #2: How to Select Trust This Computer on A Broken Screen
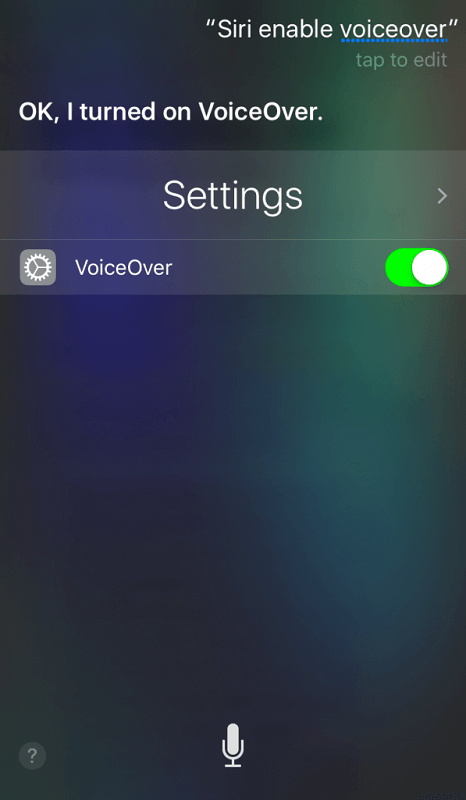
Many users claim that using Siri and the VoiceOver feature can help you tap the Trus This Computer on your iOS device even when the screen is broken. It can help a few people with a way of “how can I bypass trust my computer with my iPhone”, even if not everyone may be successful to get through with this method, but still worth a try!
Here is the step-by-step process on how to use Siri and VoiceOver:
- Activate Siri and say "Open the VoiceOver "
- Tap the Home button twice to reveal the password screen
- If the screen is not completely broken, use the remaining parts that still respond. Swipe left and right to move the VoiceOver pointer to a particular password number button. You will also hear that the VoiceOver will tell you that the button is chosen.
- Double-click to select the chosen password.
- When the iPhone is unlocked, connect your iPhone to the computer and prompt the VoiceOver to tap “Trust or Allow ” when asked to Trust This Computer.
- You will now be able to use the broken iPhone in iTunes. Do what is necessary to keep your data such as doing file transfers and backup.

If you want to turn off the VoiceOver, simply ask Siri to do it for you.
Part #3: How Can I Bypass Trust My Computer with My iPhone Disabled or Screen Broken in a Few Steps
Getting your iPhone disabled is a horrifying scene knowing that you won’t be able to use it unless you decode your own password. There are instances where we sometimes forget a few important details including our passcodes but this doesn’t mean that you are careless. It just happens.
However, if luck isn’t with you, you can use an excellent alternative to get through the annoying Trust This Computer screen. iOS Unlocker is the ultimate solution to help you bypass this part and even wipe out the passcode to set a new one.
iOS Unlocker comes with important unlocking features including the passcode unlock, Apple ID, iCloud, and also the Screen Time restrictions. You only need to get this software running on your computer.
To unlock your iPhone and bypass the Trust This Computer screen, follow these:
Step #1: Run iOS Unlocker
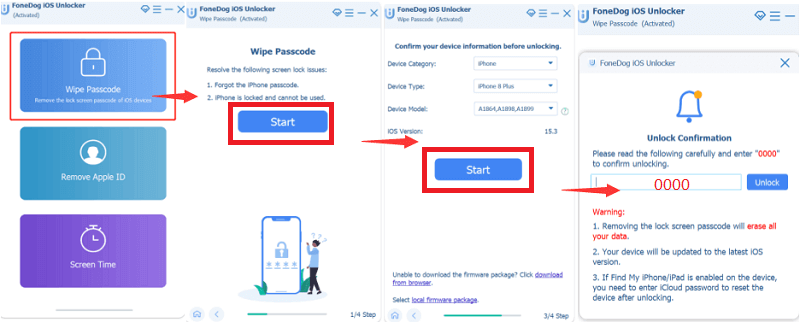
Free Download iOS Unlocker on your computer, install and launch the software. Open the program and select the Wipe Passcode menu.
Step #2: Connect the iPhone
Click Start on your computer screen and then connect your iPhone to the computer using a USB cable.
Step #3: Verify and Download iOS Firmware Package
On the next screen, you will need to verify the iPhone’s make and model. Make sure that the details are correct since you will need to download the firmware package that is compatible with your device.
Click the Start button to proceed. Note that this process can actually take a while.
Step #4: Unlock
After the device firmware has been downloaded, select the Unlock button and enter 0000 to confirm the passcode removal. Wait until the unlocking is completed.

Upon using the iOS Unlocker Wipe Passcode feature, your iOS will be updated to the latest iOS version and at the same time remove the entire data on your device. Since this method can cause data loss, you need to create a backup for iPhone prior to using this software.
People Also ReadHow to Unlock iPhone With and Without iCloud Bypass DNSHow to Bypass iPhone Passcode after Being Forgotten
Part #4: Summary
With this article guide, you will no longer ask yourself “How Can I Bypass Trust My Computer With My iPhone ” because we have gathered the different methods you can do to pass this step. The first two methods may require you to be hands-on with the processes and it may be confusing and time-consuming.
However, with iOS Unlocker, you only need to select the Wipe Passcode menu and follow the on-screen guide to complete the bypass. What is great about iOS Unlocker is that you can use it even when your device is locked, disabled, and even with a broken screen.
As much as possible, if your iPhone is not experiencing any technical issues, do not bypass the Trust This Computer part since this is an essential security feature of Apple to ensure that your data is safe even when connected to computers. Unless highly needed, then you can follow the above methods to skip this part.
Written By Rosie
Last updated: 2022-01-27