“Is it possible to convert Spotify playlists to Amazon Music ? How can I do that?”
We can’t disagree with the fact that both Spotify and Amazon Music are big names in the music streaming world. Actually, if people would be asked about their top five music listening apps, surely, these two would be on the list. Both of them have their unique features and perks offered. But still, we can’t avoid comparing one with the other.
Spotify is definitely the home for millions of songs and other contents like podcasts. What even fascinates most music enthusiasts is that aside from the paid plans that it has, it also offers a free version that can be used by anyone. Of course, with given limitations. Though Spotify seems to be a giant in the industry, we still can’t deny how good the other platforms are such as Amazon Music. And, some music lovers are surely well aware of this as well.
Thus, even some of them are open to moving from Spotify to Amazon Music. If you happen to be one of those who are also thinking about the same, it would be good to know how to convert Spotify playlists to Amazon Music, right? In this way, you can still keep the ones that you love from Spotify accessible on your Amazon Music account the moment you decided to switch over.
Let’s find out how you can finally be able to convert Spotify playlists to Amazon Music by reading the content of this article.
Contents Guide Part 1: How to Convert Spotify Playlists to Amazon Music [Via Online Tools]Part 2: How to Convert Spotify Playlists to Amazon Music [Via Music Transfer Tools]Part 3: The Best Method to Convert Spotify Playlists to Amazon MusicPart 4: Summary
Part 1: How to Convert Spotify Playlists to Amazon Music [Via Online Tools]
You might be surprised to find out that you can actually convert Spotify playlists to Amazon Music via online tools. We have two of them to present in this section of the article. Just in case you are interested in checking and using them, just keep on reading to learn further details about these online tools.
#1. TuneMyMusic
One of the most used free and online tools that can convert Spotify playlists to Amazon Music is TuneMyMusic. It has the ability to sync, upload, transfer, backup, and share playlists between music streaming services. The good thing about using this is that it does not only support Spotify to Amazon Music transfer but can also help import songs to platforms like YouTube, Tidal, iTunes, and more. If you’d like to give TuneMyMusic a shot, below are the step that you must accomplish.
Step #1. Visit the official website of TuneMyMusic. You shall see the “Let’s Start” button right away. Tap it.
Step #2. You must set up Spotify as the “source”. You can do it by either tapping its icon or inputting it into the search bar.
Step #3. Press the “Load from Spotify account” option. Just mark or select those playlists that you wish to move to Amazon Music. Afterward, you have to tick the “Choose Destination” menu.
Step #4. Amazon Music must be chosen as the destination. You would need to log into your Amazon account by providing your details. Once done, just press the “Start Transfer” menu.
When the “Transfer completed” notification is displayed on your screen, this only means that you have already successfully completed the transfer process. The selected Spotify playlists are now in your Amazon Music library.
#2. Soundiiz
Aside from TuneMyMusic, we have another online tool that can aid in the conversion of Spotify playlists to Amazon Music, Soundiiz. It actually functions the same way as TuneMyMusic and even supports 45 services, which, of course, include both Spotify and Amazon Music. Most users are saying that this online tool is one of the most reliable ones.
If you wish to try using Soundiiz to convert Spotify playlists to Amazon Music, you may refer to the below step-by-step guide.
Step #1. Go to the website of Soundiiz. You will see the “Start for free” button on the main page.
Step #2. You must select Spotify as the music service. To open your Spotify account, press the “Log in” menu.
Step #3. Start ticking which Spotify playlists you’d like to transfer to your Amazon Music account. Press the “three-dot” icon and then hit the “Convert to” menu.
Step #4. Press the “Save configuration” option and then the “Confirm” menu next.
Step #5. Amazon Music must then be selected as the destination. To open your Amazon account, you must press the “Sign in to Amazon Music”.
And, that’s it! Your Spotify playlists will now be moved to your Amazon Music account.
Part 2: How to Convert Spotify Playlists to Amazon Music [Via Music Transfer Tools]
Aside from free online tools, there are also some music transfer tools that can help you convert Spotify playlists to Amazon Music. Just take note that some of them would require payment if you were targeting to processing bunches of playlists. Let’s get to know them more.
#1. MusConv
One of the music transfer tools that we have here is MusConv which is subscription-based. Though it’s a paid platform, you can enjoy transferring playlists between more than 50 music streaming services like Spotify and Amazon Music. You may try its free trial offer before getting a subscription plan. Of course, there are restrictions, such as the number of playlists that you can process per day. Just in case you decid to try this one, here is a guide to using it well for your easy reference.
Step #1. Download MusicConv and install it on your PC.
Step #2. Press the “Log in” menu to enjoy the free trial offer.
Step #3. In the source music platform menu, Spotify must be selected. Afterward, you need to open your Spotify account.
Step #4. Choose which playlists you’d like to transfer. Press the “Transfer” button afterward.
Step #5. Of course, Amazon Music must be chosen as the destination. Once done, open your Amazon Music account as well.
Step #6. Just browse your Spotify files and then hit the “OK” menu to begin the transfer process.
#2. FreeYourMusic
The second on the list of music transfer tools that have the ability to convert Spotify playlists to Amazon Music is FreeYourMusic. You don’t have to worry about using this, as it is secured and would keep your data private. You can use it on your Mac, Windows, Linux, iOS, and Android.
Here is how you can use FreeYourMusic.
Step #1. You must download FreeYourMusic on your PC first.
Step #2. Spotify must be chosen as the source.
Step #3. From the available sources, Amazon Music must be selected as the destination.
Step #4. Open your Amazon Music account to continue.
Step #5. Start choosing which Spotify playlist you’d like to move to Amazon Music.
The conversion will then begin. After it’s done, you may head back to your Amazon Music library to see if the transfer has been completed successfully.
#3. SongShift
If you are an iOS user, you may try using SongShift instead to convert Spotify playlists to Amazon Music. While using this app, you have to make sure that your device is connected to a stable Wi-Fi network, as it requires an internet connection to function.
You can downloadl it from the Apple Store. Though good enough, there are sometimes Spotify music files that can be synced. If you are fine with this, you may use the below guide as your reference to utilize SongShift during the process.
Step #1. Download and install SongShift, and then launch it right away.
Step #2. You have to tap the “SongShift” icon. Afterward, press “Setup Source”.
Step #3. Spotify should then be selected as the source. Provide your Spotify account details to log in.
Step #4. For the destination, Amazon Music must be chosen. In the same way, you also need to sign into your Amazon Music account.
Step #5. After getting both services connected, you have to press the “Setup Source” option again in order to start selecting the Spotify playlist to be transferred.
Step #6. Tap the “Setup Destination” menu next. Choose Amazon Music.
Step #7. Click the “Create New Playlist” button to select the Spotify playlists. Finally, tap the “OK” menu to begin the transfer.
Part 3: The Best Method to Convert Spotify Playlists to Amazon Music
Upon sharing the methods of how to convert Spotify playlists to Amazon Music via online and music transfer tools, we are now down to discussing the best way to accomplish this process.
Though the previous options are reliable and good enough, some of them need an internet connection to function, and others would require fees (otherwise, you have to deal with the given limitations or restrictions when using them). Considering these drawbacks, it would be good to find the best tool that could help with the process of converting Spotify playlists to Amazon Music without facing any issues along the way.
Luckily, Spotify Music Unlocker can get us covered. It has the ability to easily convert Spotify playlists and unlock them from DRM protection. It supports various flexible formats, which include MP3, WAV, FLAC, and M4A. It even performs lossless conversion.
To begin using Spotify Music Unlocker, download it first and install it on your computer. Launch it after successfully installing it. And then, follow the below guide.
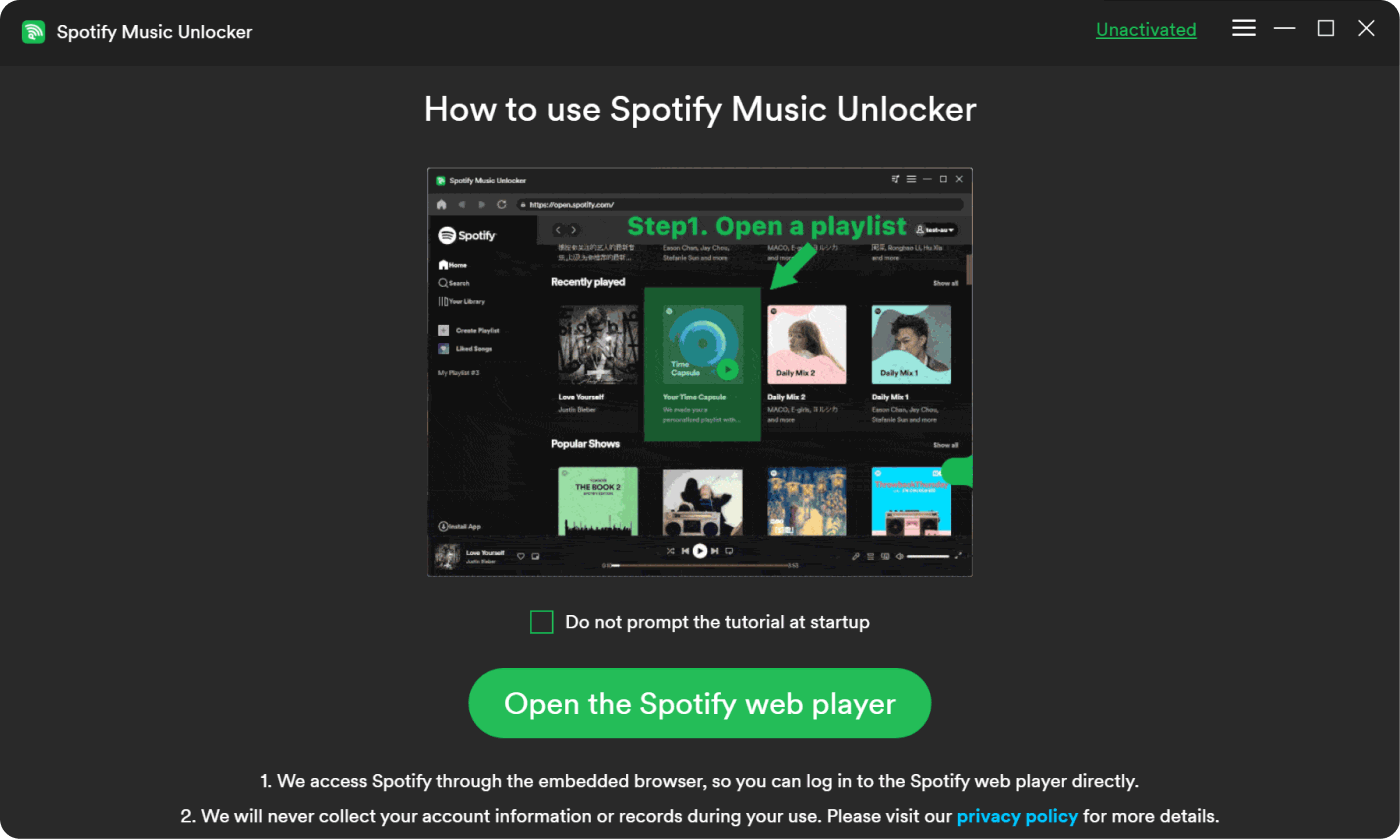
Step #1. Press the “Open Spotify web player” button, which you will immediately see on the main page of the app once opened.
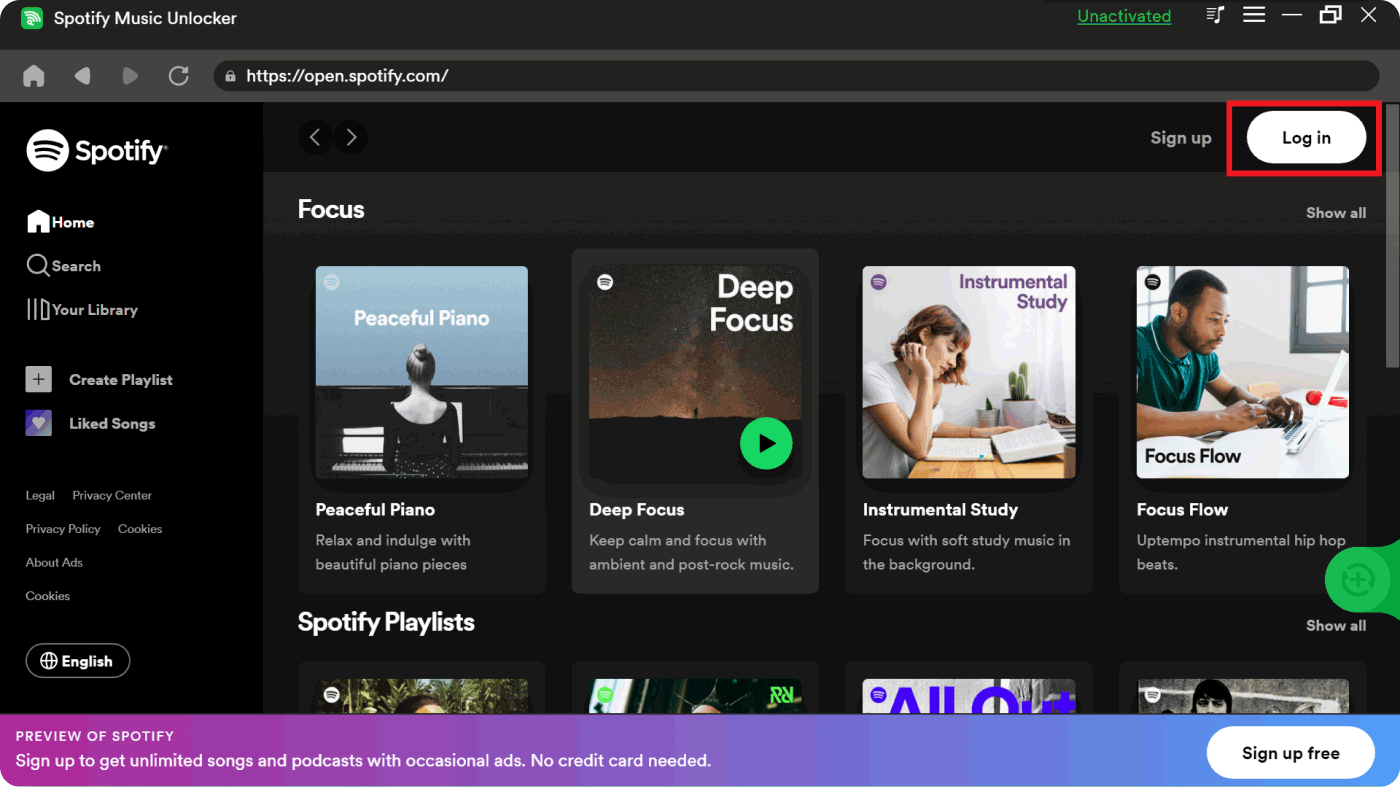
Step #2. You will be brought to a new page where you have to provide your Spotify account details to log in.
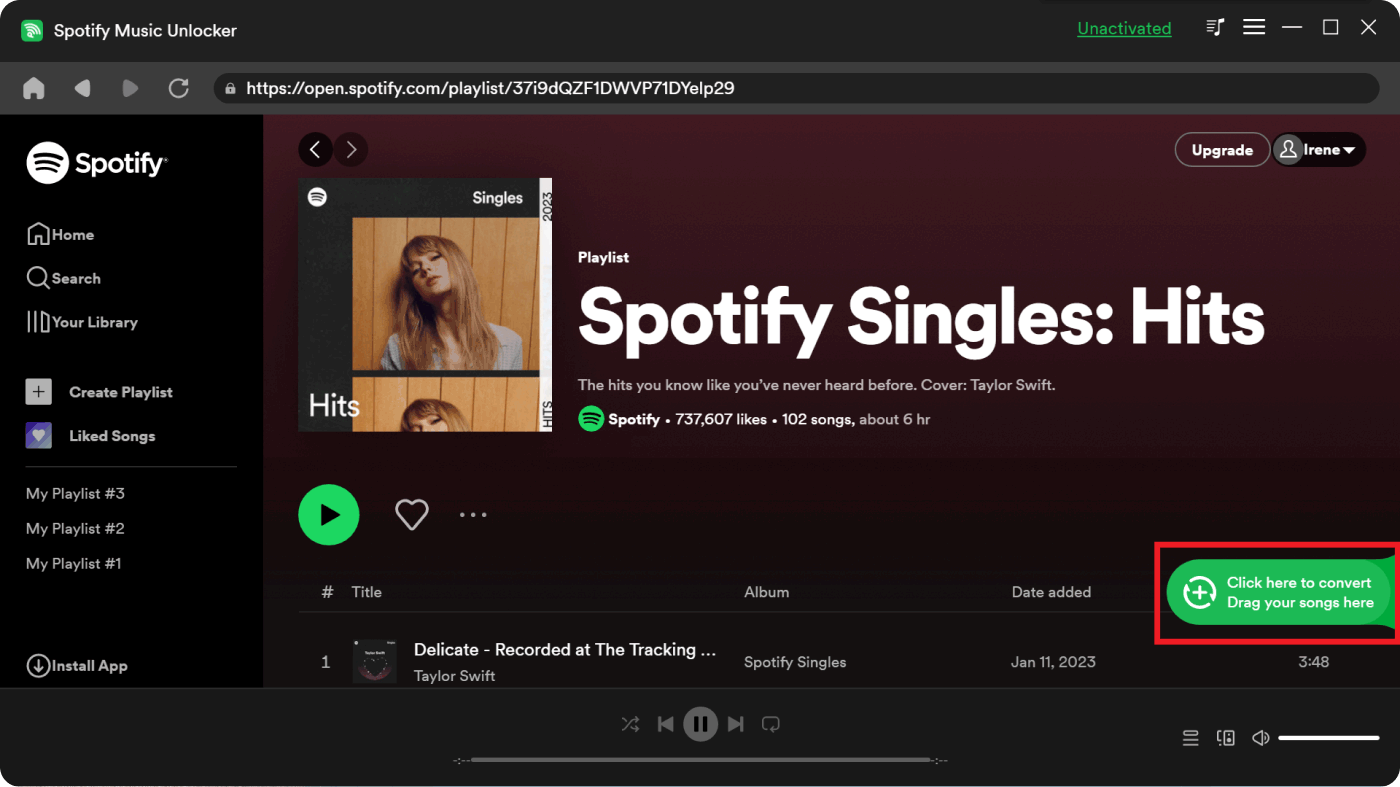
Step #3. Begin to choose the Spotify playlists that you like to process. Press the green “add” icon on the side to add the songs. Dragging and dropping will also work.
Step #4. From the available output formats, choose which one you’d like to use.
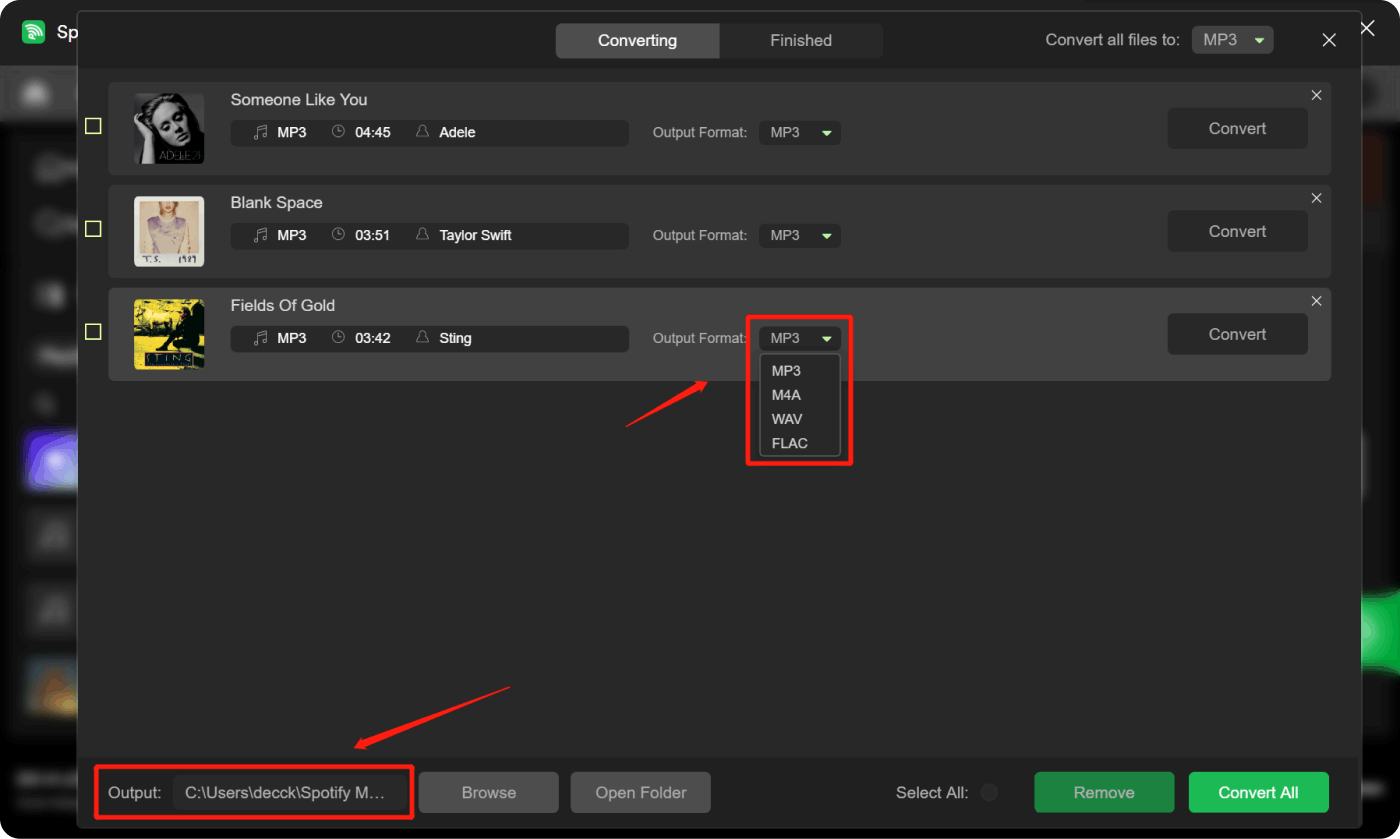
Step #5. The conversion of the added playlists will start once the “Convert” or “Convert All” option has been tapped.
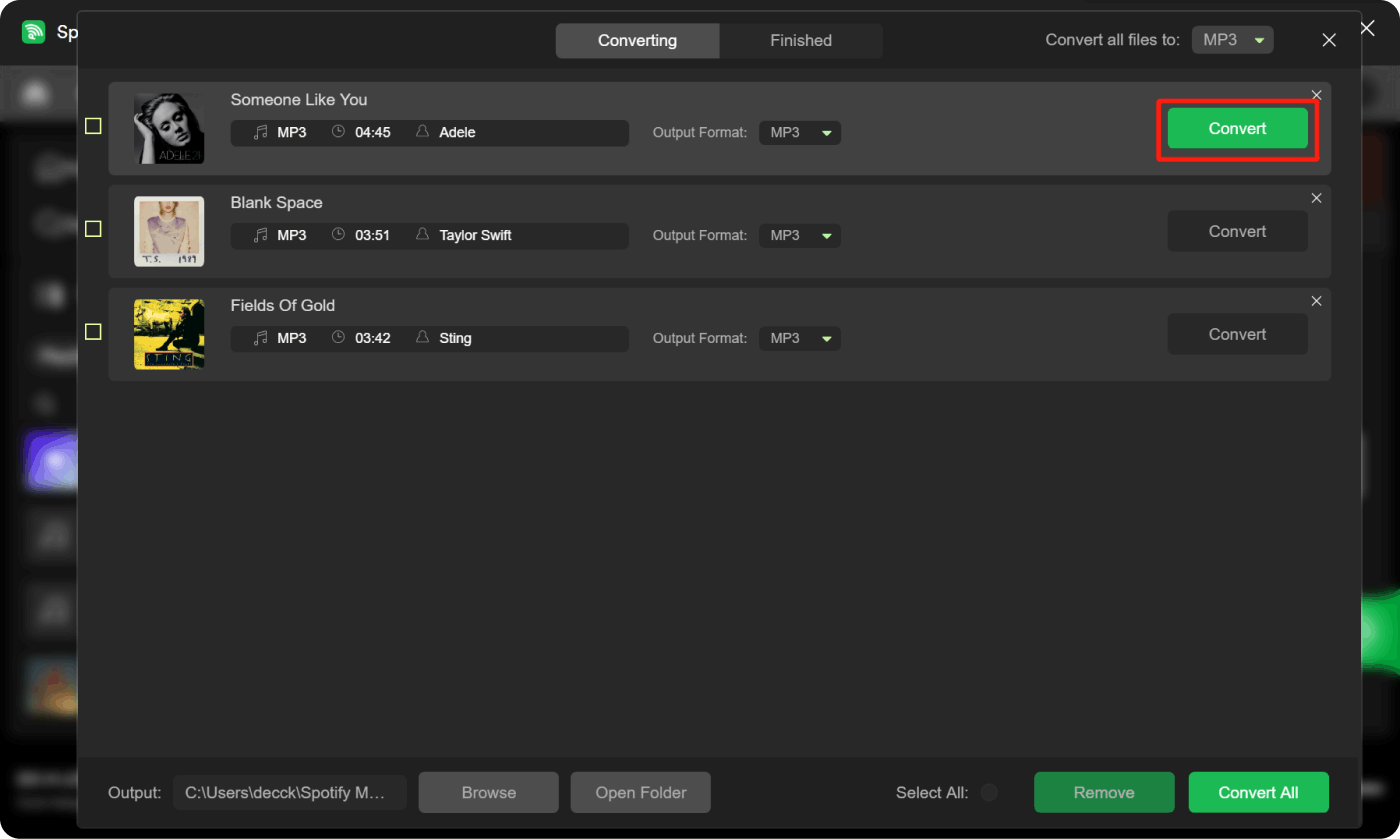
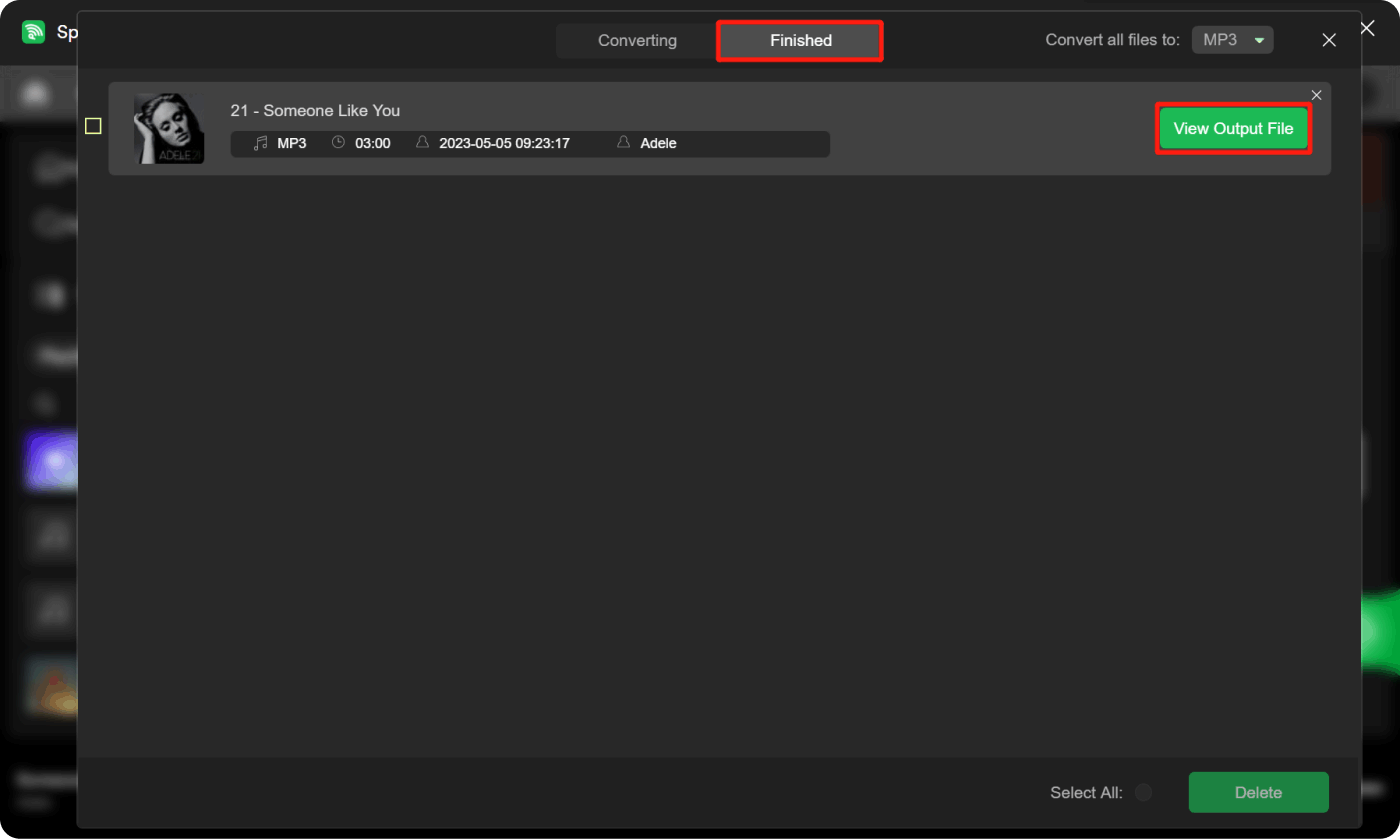
In a few minutes, you will get the converted and DRM-free Spotify playlists. For ease of viewing the list of the processed tracks, you may also go to the “Finished” tab and then choose the “View Output Files” option.
Importing the Converted Spotify Playlists to Amazon Music
Once you have already converted the Spotify playlists to formats like MP3, WAV or FLAC, it is now time to import them to Amazon Music. Here is an easy guide for your reference.
- On your computer, open the Amazon Music app. Provide your account details to continue with the login process.
- Tap “Profile”. Make sure to select the “Settings” menu next.
- Scroll until you see “Music Management”. Look for the “Automatically Import Music From” option. Click it once found.
- Press the “Select Folder” option. Head over to the music source location and then open the file or folder to be imported.
- Upon adding, you have to ensure that you also enable the added music location.
You should be able to see the imported Spotify playlists by pressing “Library” and then choosing “Music” next. The imported tracks should be under the “Songs” menu with “downloaded” status. You are now free to create a new playlist for them on Amazon Music if you want to!
Part 4: Summary
In order to convert Spotify playlists to Amazon Music, the best method would still be to rely on professional tools like Spotify Music Unlocker. Though there are free and online methods, limitations are still present when using them, which could still cause hassles and burdens along the way. But, of course, the decision is still yours if you’d like to try those options.
People Also Read The Top Paid And Free Spotify to MP3 Converter Tools How to Sync Spotify to Apple Watch: A Step-by-Step Guide
Written By Rosie
Last updated: 2023-08-03