Amazon Music Unlimited is one of the most amazing ways to access music these days; it is like Apple Music and Spotify. However, there can be instances where you want to cancel Amazon Music Unlimited subscription for many possible reasons. If you have decided to get a subscription, it is important to know that it will automatically renew after a certain period of time and will eventually cost you some money.
If you have finally decided to cancel Amazon Music Unlimited subscription, things can be easily done; you just have to make sure that you follow everything that we are going to share in this article. We are going to discuss solutions and methodologies that you have to follow step by step in order to cope with the cancellation.
We are also going to give you an idea of how you can continuously listen to songs you love on Amazon, even if you have already canceled your subscription. There are lots of exciting things to know, so you better get ready as we discover a lot of useful information in this post.
Contents Guide Part 1. Reasons Why You Should Have Second Thoughts On CancellationPart 2. Learning How To Cancel Amazon Music Unlimited SubscriptionPart 3. The Most Convenient Way To Download Music Tracks From AmazonPart 4. To Summarize It All
Part 1. Reasons Why You Should Have Second Thoughts On Cancellation
It is not always easy to let go of something you have always loved. It is also important that you think of multiple reasons for weighing your final thoughts and decisions in case you have an idea in mind to cancel Amazon Music Unlimited subscription. In this part of the article, we are about to share some reasons why you should have second thoughts on cancellation in order to determine how sure you are about proceeding with your decision.
Amazon Has A Huge Library
One of the main reasons people availed of the Amazon Music subscription is because of its vast library; it could also be a reason why you should stop canceling. Who knows? If you are subscribed to Amazon Music Unlimited, you get to access 100 million songs that are ad-free.
These songs can be enjoyed in HD, and there is also a catalog of vast music in Ultra HD and Spatial audio quality. There is also a huge library of podcasts that you can listen to ad-free. Unlimited membership also includes access to many playlists and stations as well.
You Can Enjoy It On Amazon Prime
There is no need for you to have an Amazon Music Unlimited Subscription in order to enjoy music from Amazon. Apart from Amazon Music Unlimited member, a Prime member has access to over 100 million songs that can be enjoyed in All-Access playlists and shuffle modes.
Access to podcasts without any ad interruption is also included with the said membership. In order for you to have a huge view of the benefits of being a Prime member on Amazon, we have some of the key benefits of being one. Let us see them below.
- You can enjoy lots of books in different ranges! It also includes magazines that will definitely fit your mood!
- If you are a subscriber, you get to access a selection of games that are free every week.
- You get to enjoy a free subscription to your favorite Twitch streamer.
- You can also share your account with another adult if you are enjoying Prime Household.
- You can also link adult accounts and children’s accounts so that you can share your joy of books, apps, eBooks, magazines, and a lot more.
- You can also check your favorite TV shows as well as the best ones using Prime Video.
You Are Home With Amazon Music
Another reason why you should rethink canceling your Amazon Music Unlimited subscription is that it can bring you closer to music and to people you adore as well. As a listener to Amazon Music, you can enjoy hundreds of originals from artists that are emerging and popular in every genre!
Their music is available to be purchased and streamed on Amazon Music. You can enjoy listening to what you love, as well as share your love for music with people you also treasure and adore.
These are the reasons why you should have second thoughts before you cancel Amazon Music Unlimited subscription. But if you want to continue canceling because you have other reasons to consider, we are also going to share steps on how to cancel your subscription below.
Part 2. Learning How To Cancel Amazon Music Unlimited Subscription
In the next part of the article, we are going to discuss the different methods for canceling to cancel Amazon Music Unlimited subscription. We are also going to share with you the step-by-step procedures on how to process the cancellation. Let us have the methods below.
Method 1. Cancel Using Your Web Browser
It is easy to cancel Amazon Music Unlimited subscription as long as you follow the right steps on how to execute it. You can do it using your web browser on your personal computer or even through the use of your mobile device. In order to execute this method, you have to follow the steps that we have listed below.
Step 1. To start the process, hover over the Amazon Music web player, and then use your account credentials to log into your Amazon Music Unlimited account.
Step 2. Then, click the “Settings” option, and then choose the “Your Amazon Music Settings” option.
Step 3. You will see a new page where all the details of your Amazon Music Unlimited plan are shown. You just have to choose the “Cancel Subscription” option and then follow the succeeding prompts. In order to proceed with the cancellation, you have to choose the “Confirm Cancellation” option to finalize the process.
Method 2. Cancel Using Your Mobile Device
You can also cancel Amazon Music Unlimited subscription from the comfort of your own mobile device. You just have to make sure that you are connected to a stable internet connection and that you have installed the Amazon Music app on your mobile device before proceeding with the process. Once you have secured everything, you can now follow the set of steps that we have below.
For Android Devices
Step 1. Launch the Amazon Music app, and then at the top right part of the screen, choose the “Settings” option.
Step 2. Start looking for the “Your Account” option, and then select the “Music Settings” option.
Step 3. There will be a new window that will open, and then you have to choose the “Cancel Subscription” option, follow the steps that will be shown, and choose the option that says, “Confirm Cancellation."
For iOs Devices
Step 1. On your iPhone, launch the Settings app, and then hover over your own account.
Step 2. You will see a new window. Choose the “Subscription” option, and then look for Amazon Music. You will see next to it the “Cancel Subscription” option. Tap it.
Method 3. Cancel Using iTunes Or Apple Music
You can also use your iTunes or Apple Music to cancel Amazon Music Unlimited subscription. The process is also easy and quick. We have enumerated the steps below.

Step 1. On your Mac or Windows computer, launch the Apple Music or iTunes app.
Step 2. Then, from your menu, you need to tap the “Account” option, and then tap the “View My Account” option.
Step 3. Then you will see a pop-up menu page, choose the “Settings” option, and then tap the “Subscription” option.
Step 4. Look for the “Amazon Music” option, and then choose the “Edit” option. You will then see a new page, and you should choose the “Cancel Subscription” option as you see it. Then, in order to confirm the cancellation, follow the steps that you will see.
These are the three easy methods that you can try to use in order to cancel your subscription to Amazon Music. Once done, you can finally let go of the dilemma of having to pay monthly just to enjoy the subscription. In the next part of the article, we are going to talk about a method where you can enjoy downloading music tracks from Amazon Music without any dilemma or delay.
Part 3. The Most Convenient Way To Download Music Tracks From Amazon
We have talked about different methods by which anyone can cancel Amazon Music Unlimited subscription, and we hope that you have come up with a solution that you can execute to finally go through the cancellation.
In this part of the article, we are going to discuss a professional tool that can help us easily download tracks from Amazon Music. This will help us enjoy listening to music that we love from Amazon even if we do not have a subscription or internet connection to use. As we know, the reason why it is not possible to download music files from Amazon as local files is because of the DRM encryption that protects the files from being distributed or shared illegally.
The tool is known as the Amazon Music Unlocker, which is a reliable partner in converting your music files from Amazon to MP3 or other flexible formats of music files like M4A, FLAC, WAV, and a lot more. By having these types of music files, sharing and transferring will be easier, as you do not have to deal with format or device incompatibilities.
The DRM encryption protection will also be removed once the conversion is finally finished. The conversion process is also fast, and the steps to follow are simple and easy to understand. We have shared the steps to take in order to properly convert your Amazon Music tracks.
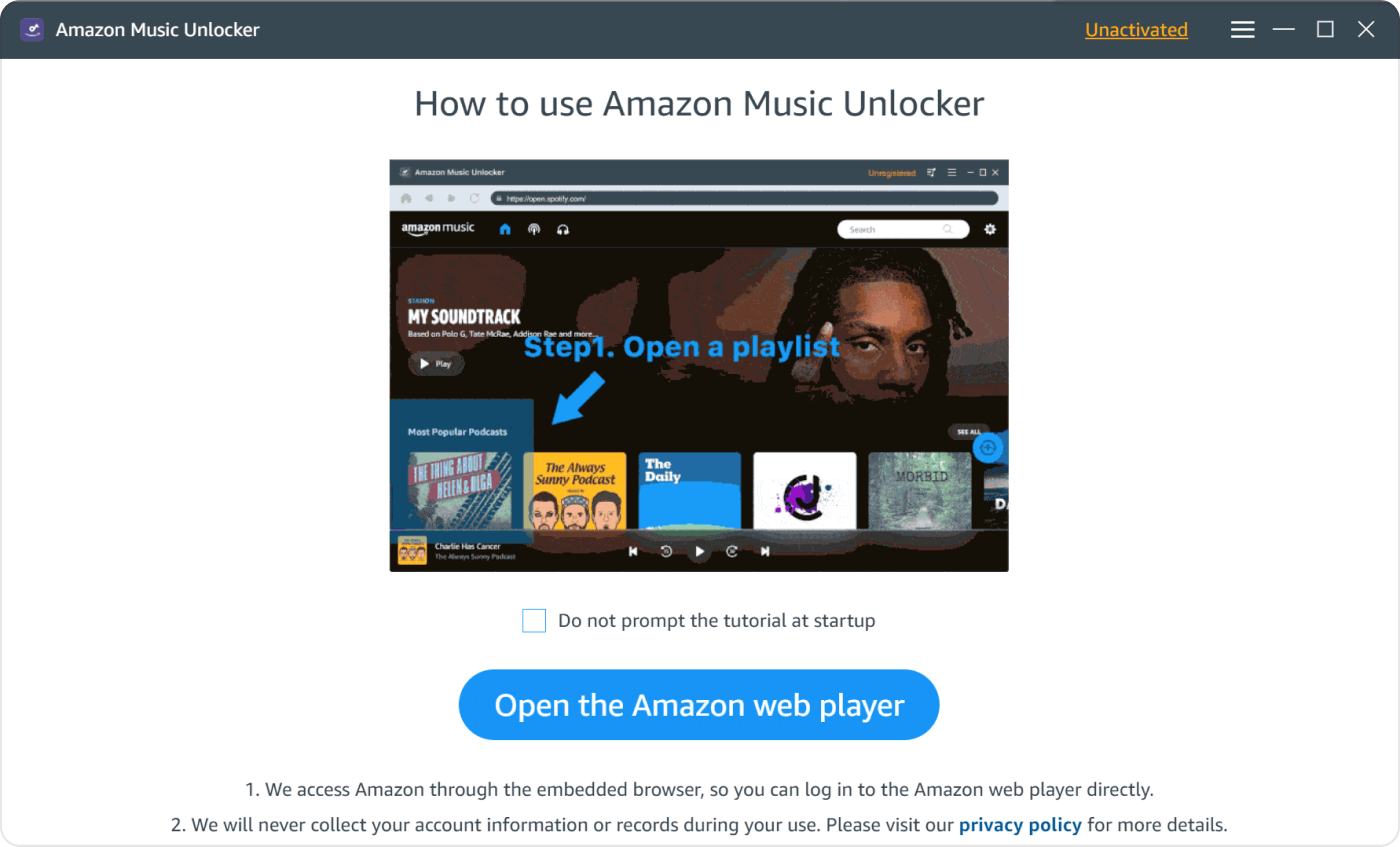
Step 1. Start to download and install the Amazon Music Unlocker on your device, and once done, open it. You will then see the “Open the Amazon Web Player” option; choose it.
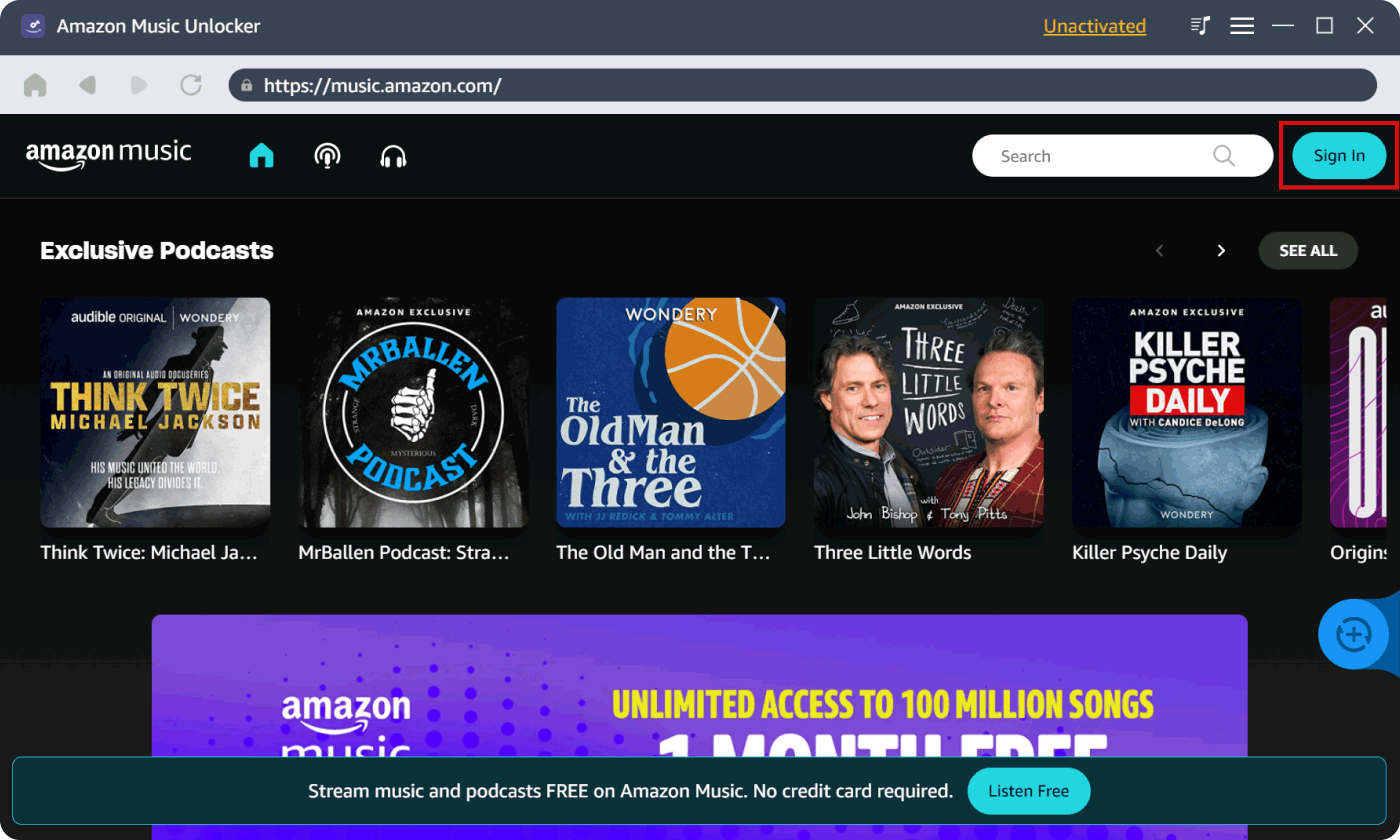
Step 2. As you tap this option, another window will open, and you will see the “Sign In” option. Tap it, and then start typing in all your account credentials to continue signing in. All your personal details shared within the tool are protected and secured, so there is nothing to worry about.
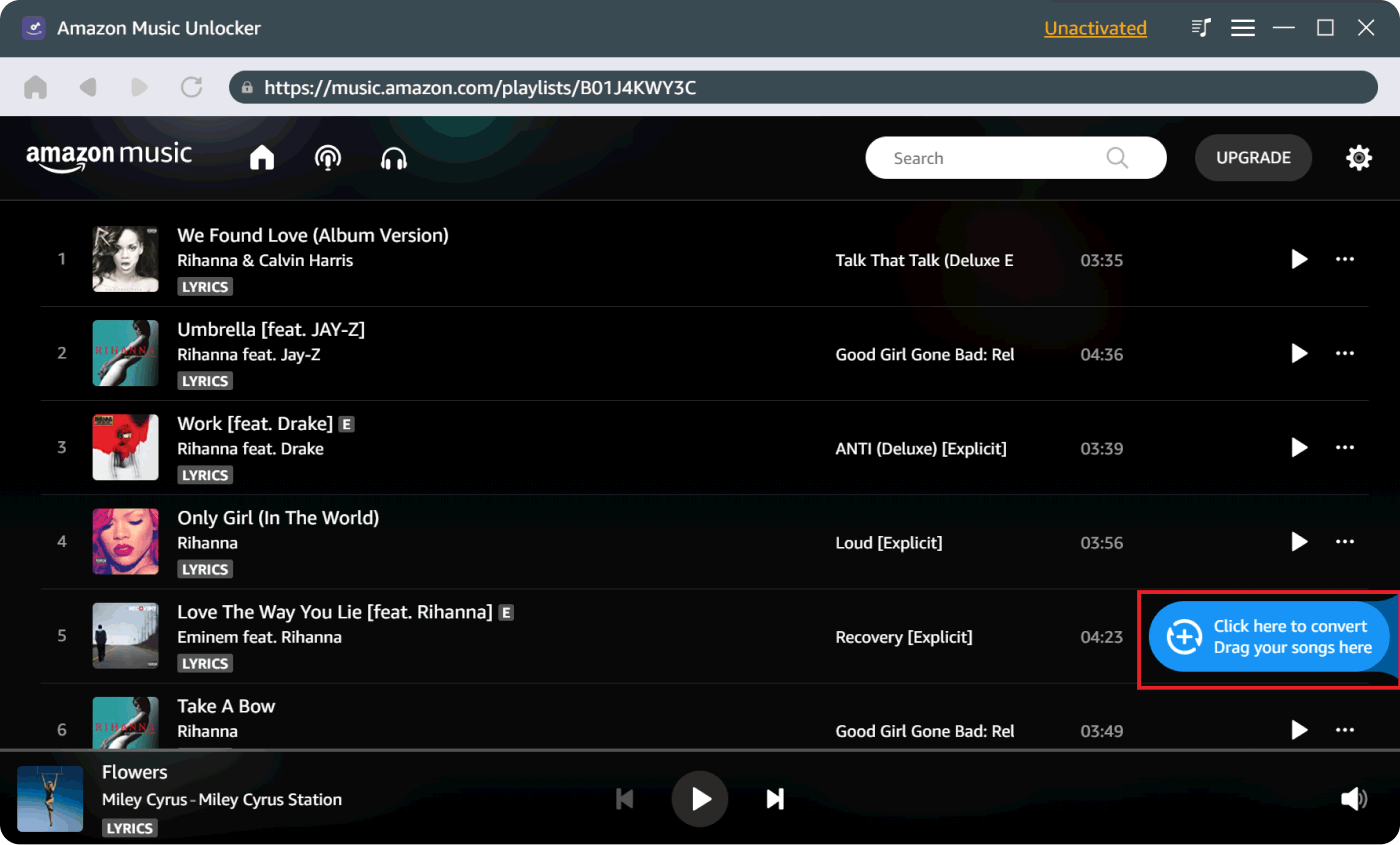
Step 3. Once signed in, you can now choose any music file, playlist, or album that you want to convert. Once you have chosen all that you want to convert, hit the blue add icon, and all your chosen tracks will be added to a list. You also have the option to drag the playlists or albums to the blue add icon; this is also applicable to individual tracks if you want.
Step 4. Then, for the next step, you need to start selecting the file formats of the outputs that you want to have. You can choose from WAV, FLAC, MP3, and M4A. You also need to set up the output folder; you can create a new one or assign an existing folder if you want.
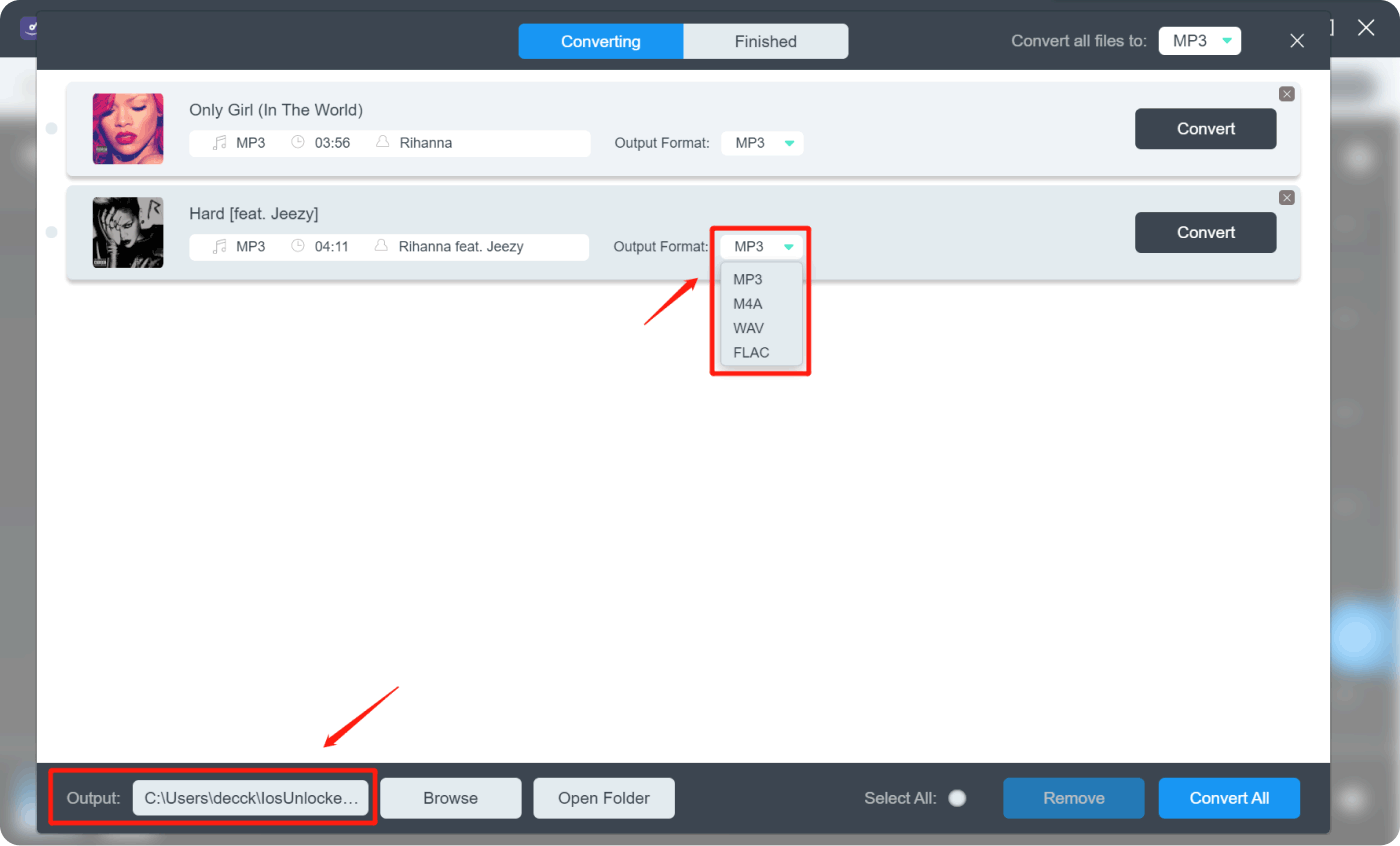
Step 5. For the last and final step, tap the “Convert” button if you want to convert an individual music file, and then tap the “Convert All” button if you want to convert multiple items!
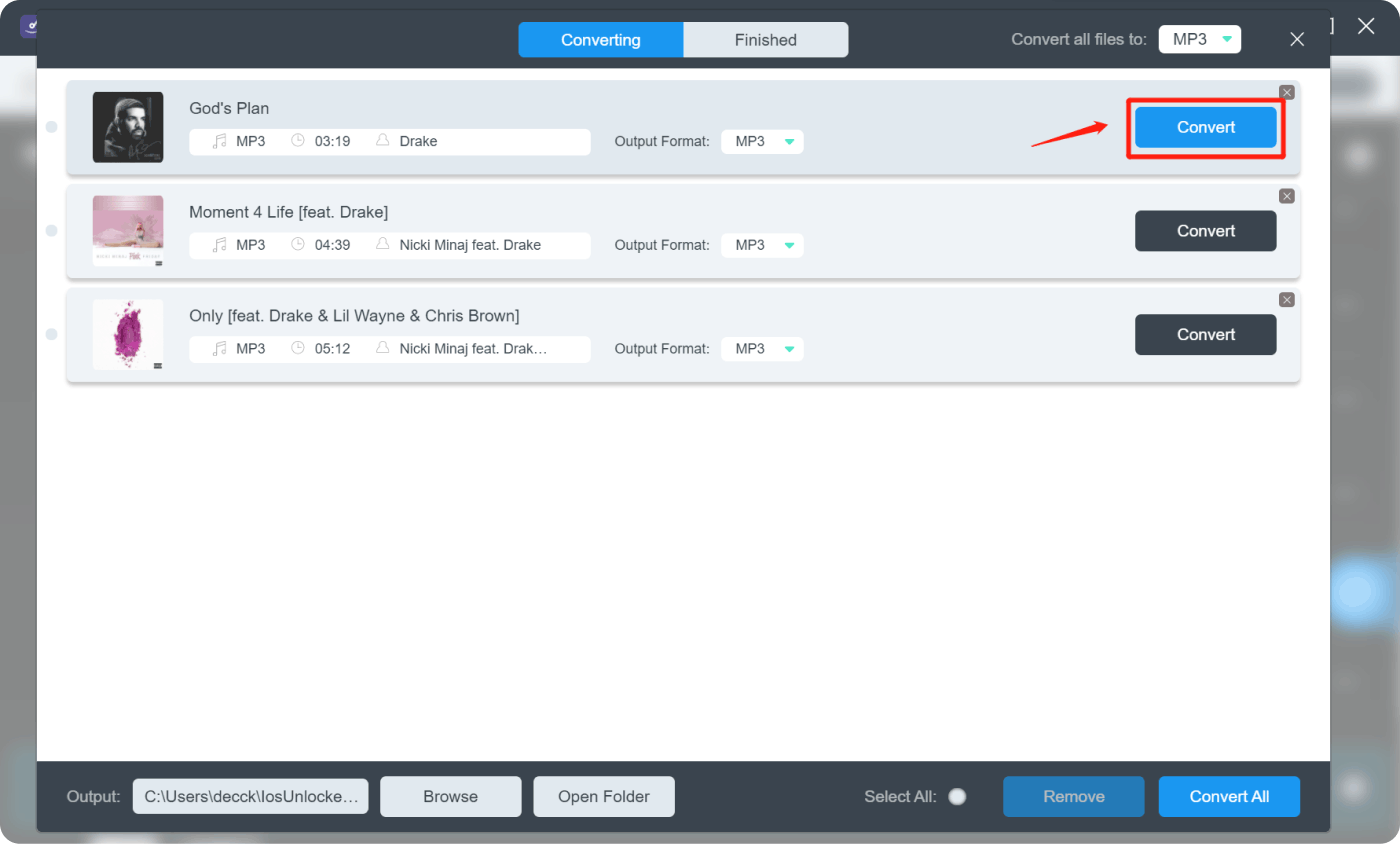
In just a few minutes, you can finally view the outputs in the “Finished” section and under the “View Output Files” option.
Part 4. To Summarize It All
We have finally discussed all the possible methods to cancel Amazon Music Unlimited subscription, and this also means that you have finally found another way to enjoy music files from Amazon without spending too much money and effort.
It can only be possible with the help of the Amazon Music Unlocker, which we have shared and discussed in the previous parts of the article. With its help, listening to Amazon Music will be as easy as we thought it would be.
People Also Read Unveiling the Path: Where Does Amazon Music Download to? Guide: How to Transfer Amazon Music to Spotify in 4 Ways
Written By Rosie
Last updated: 2023-07-27